
PANORAMIC ACCORDION
Turn panoramic photos into folding leaflets
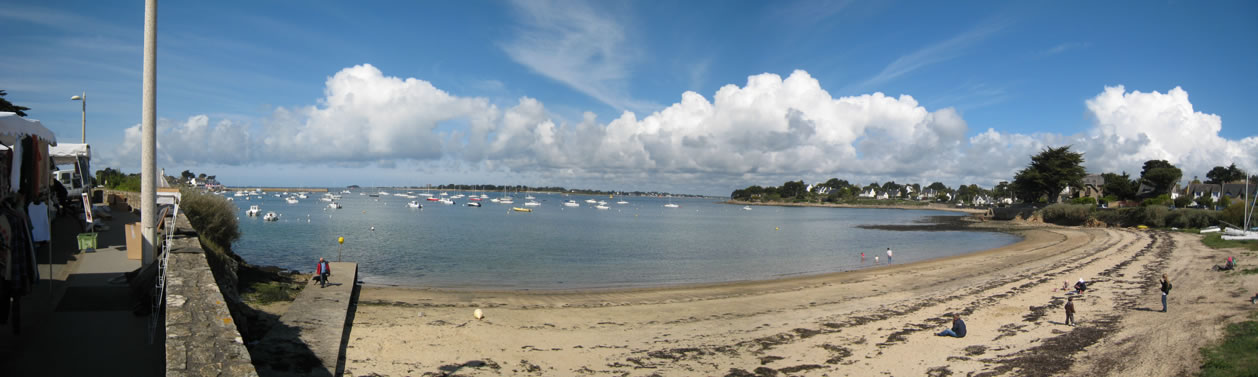
Here is the photo that I propose to turn into ... ACCORDION with PHOTOSHOP.
It is a panoramic view of Port Navalo (Morbihan - Bretagne) which was obtained by combining 3 pictures using the "Photomerge" : File> Automate> Photomerge... (The results of the new and improved Photomerge are remarkably good).
And when you're done, you will get something like this:
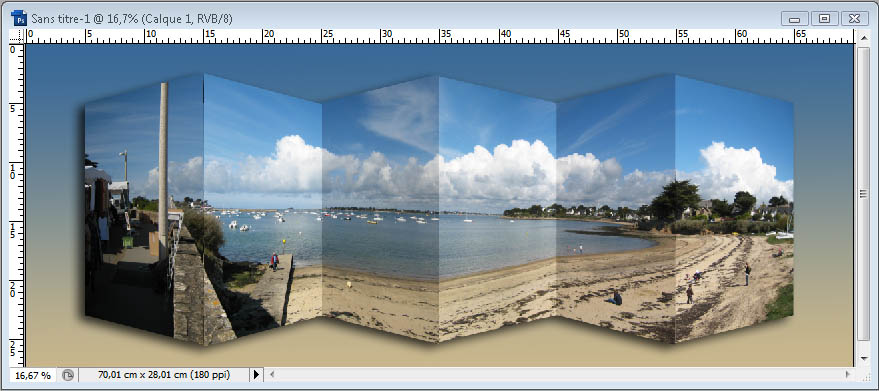
Perfect to enhance your scrapbooking pages!
 How to do this?
![]() Start by opening your image in Photoshop ... In the Image menu, Click Canvas size. In the dialog that opens, check "relative" and type 10cm in the height box (do not increase the width now). What effect will enlarge your photo by letting you place to work above and below.
Start by opening your image in Photoshop ... In the Image menu, Click Canvas size. In the dialog that opens, check "relative" and type 10cm in the height box (do not increase the width now). What effect will enlarge your photo by letting you place to work above and below.
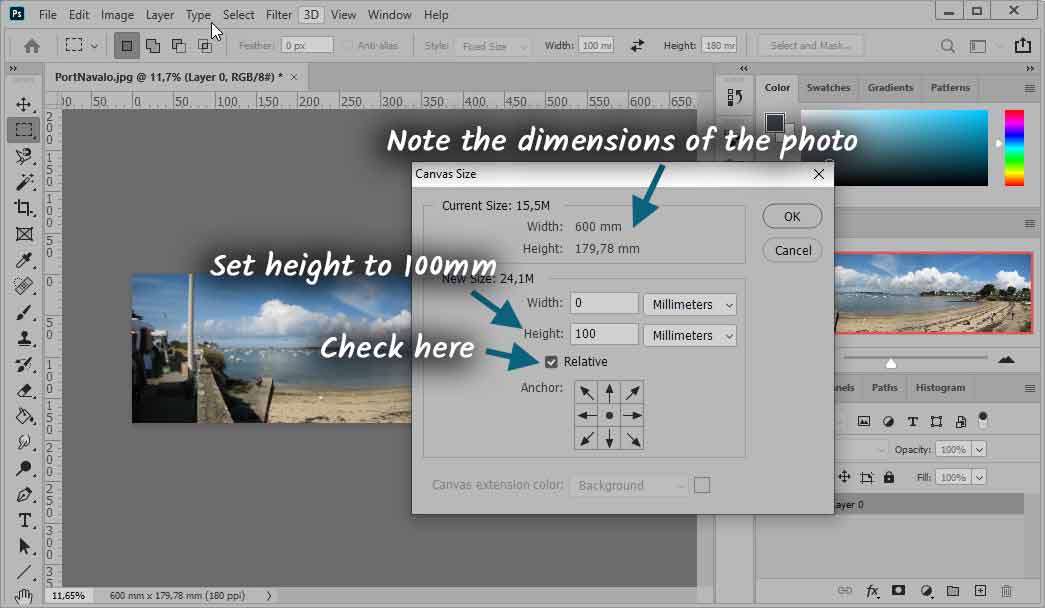
Look at its dimensions ... it measures 60cm on 18 ... and I chose to divide into 6 vertical panels ...So each panel measures 10x18 ...
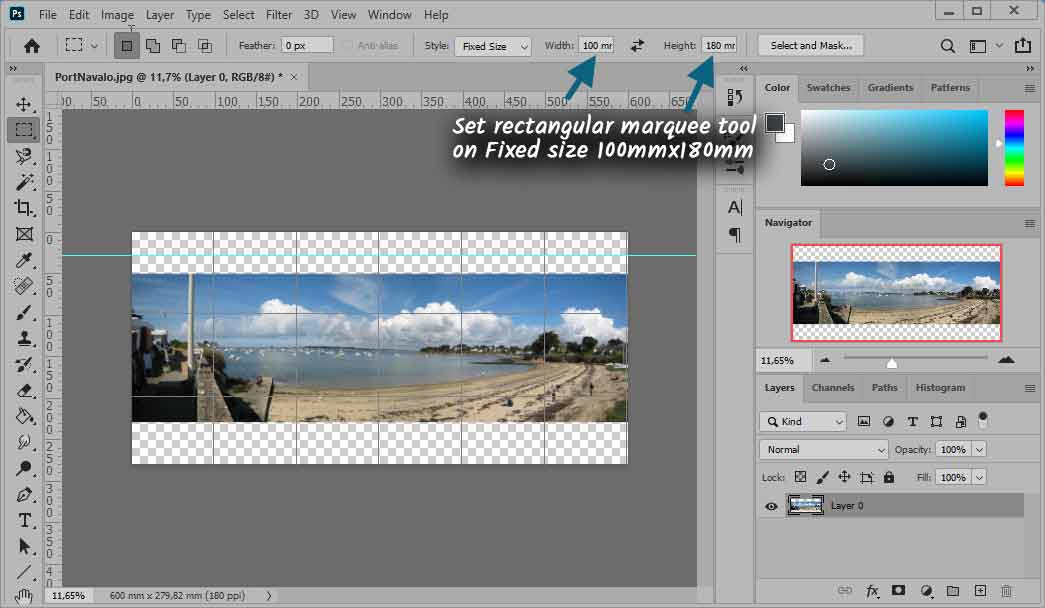
Click on the rectangular selection tool and set its options as below Fixed Size style, l=10, L=18
![]() Use now View> Show> Grid. The grid appears.
Use now View> Show> Grid. The grid appears.
Now adjust the grid displaying the menu Edit> Preferences> Benchmarks, Grid... and selecting a no 10cm (6x10 = 60) and subdivision 1.
Click in the ruler just above the image and drag holding left click down to get a trait marker to 2.5 cm above the image.
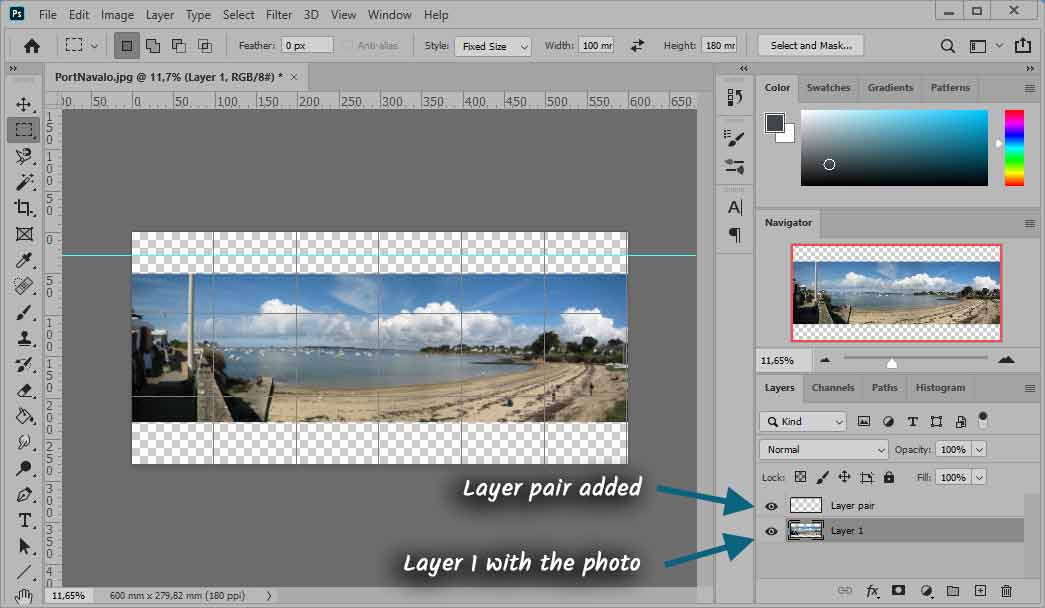
Create a new layer and name it "Layer pair"
Finally we get:
![]() Warning ... It begins now!
Warning ... It begins now!
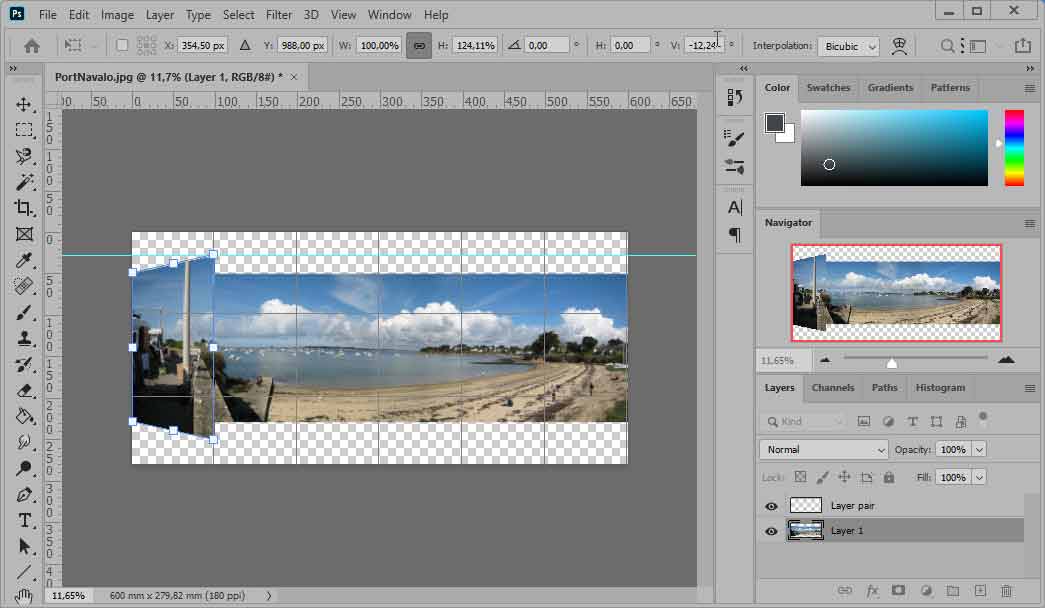
With the rectangular marquee tool Click the left corner of the picture ... A selection of 10 out of 18 is displayed.
Then use Edit> Transform> Perspective and pull the top right handle to deform this initial selection to trait marker.
Select Now the second part of the image by helping you to the grid. Copy and Paste your selection and in the layer pair. Quit Layer 1 and go to the layer pair.
Repeat Edit> Transform> Perspective and deform the selection by pulling this time the top left handle.
When it's OK, Confirm and go to the layer 1. Select the third part ... and repeat operations to obtain :
Select the 4th part, Copy and the Paste in a new layer... Then deform again with the perspective tool ... and finally merge the new layer with the layer pair.
Go to the layer 1 ... As above.
![]() Select the last part. Copy and Paste in a new layer. Distort and merge with layer pair.
Select the last part. Copy and Paste in a new layer. Distort and merge with layer pair.
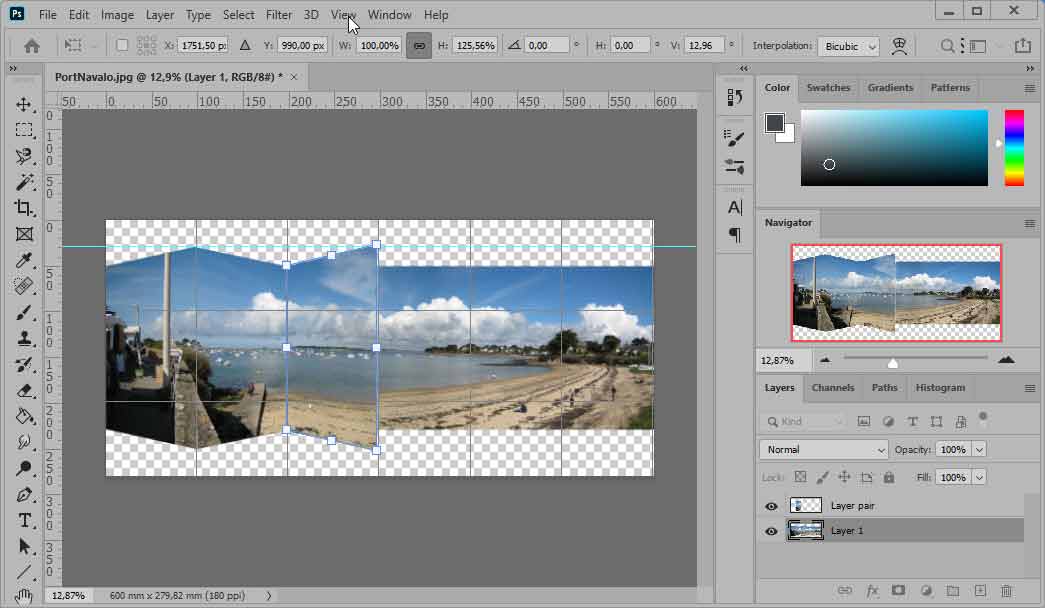
You've get your picture accordion! Parts 1, 3 and 5 are in the layer 1 (with other non-deformed) and Parts 2, 4 and 6 are in the layer pair ...
![]() Hide the grid, and made clear the line marker ...
Hide the grid, and made clear the line marker ...
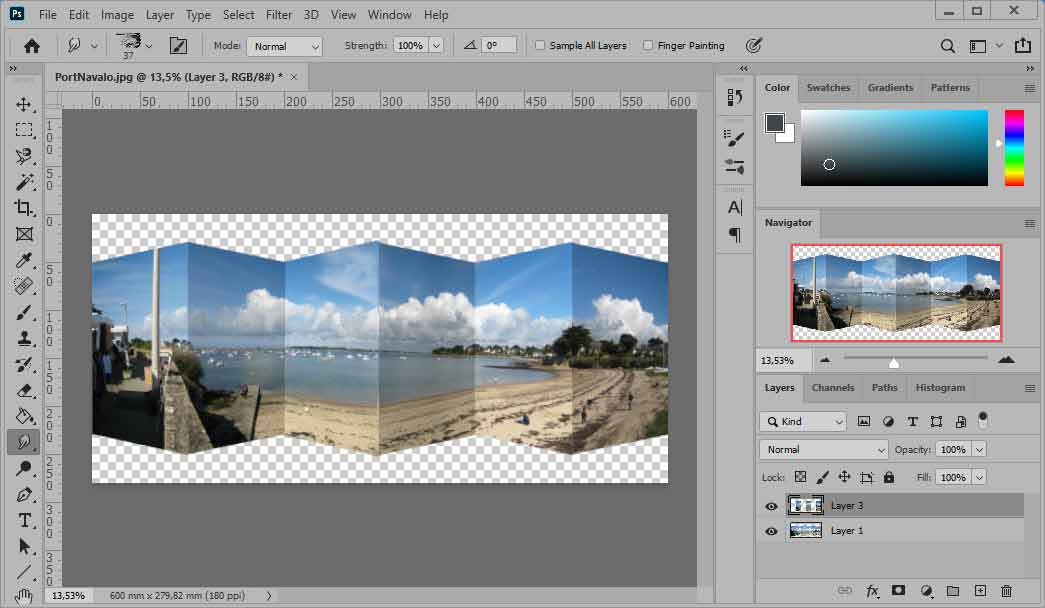
To provide relief, you will slightly underexpose the Layer 1 and over-expose parties in pairs layer pair :
- Select Layer 1 and make Image> Adjust> Brightness and Contrast. Spend the brightness -20
- Select Layer 2 and always Image> Adjust> Brightness and Contrast pass the brightness at 20.
The 3D begins to emerge.
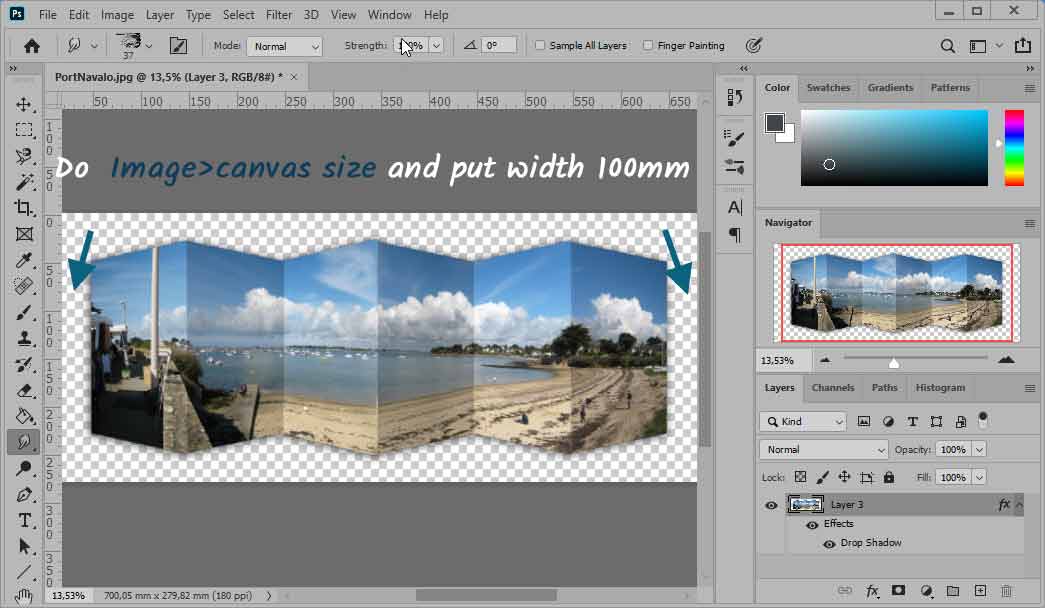
Make Image> Canvas Size and in the dialog box, select on and change it width to 10cm.
Merge the two layers (1 and pair).
Double-click the layer 1 and, in blending options, Check drop shadow and adjust for the shadow appears on the left.
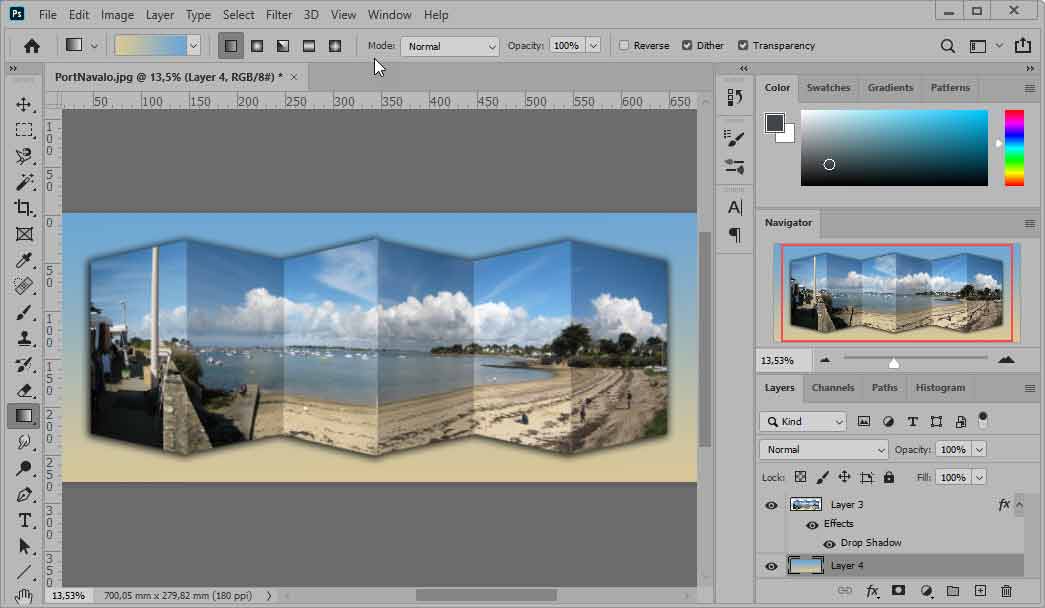
![]() It remains now to give a background to our image ... Why not with the gradient tool between the sky blue and the sand beige ?
It remains now to give a background to our image ... Why not with the gradient tool between the sky blue and the sand beige ?
Create new layer in which you apply this gradient. Then merge layers. Your accordion is finished!
Encyclopedia
of scrapbooking
Creating Keepsakes
Introducing the scrapbooker's new best friend. When it comes to making the most of your memories, take a page from the Creating Keepsakes experts.

(click to enlarge)
Beginners and more veteran scrapbookers
my opinion : one of the best !
OutStanding
mini album
Jessica ACS
Mini albums have become a popular medium for scrapbookers - they are small enough to complete in a timely manner but big enough to tell a story.

(click to enlarge)
Features 50 albums with step-by-step instructions for over 30 projects - perfect for scrapbookers of all levels.
my opinion : if you love mini album... it's the right book !
Make It in Minutes :
Mini-Books.
Roxi PHILLIPS
So many styles, so many reasons to make them !

My opinion : All the basic techniques are covered, along with plenty of tip boxes and many advices on choosing paper and other materials.