
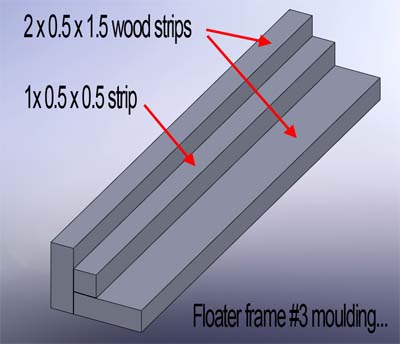
Floater frame model #3
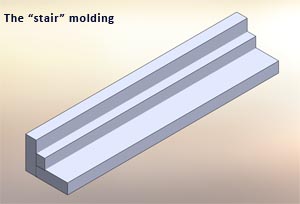
Stair shaped molding floater frame
I propose you a variation on the floater frame (called in France "American Case" or "American Box")… which will be used to frame this “nude with pink bottom”.
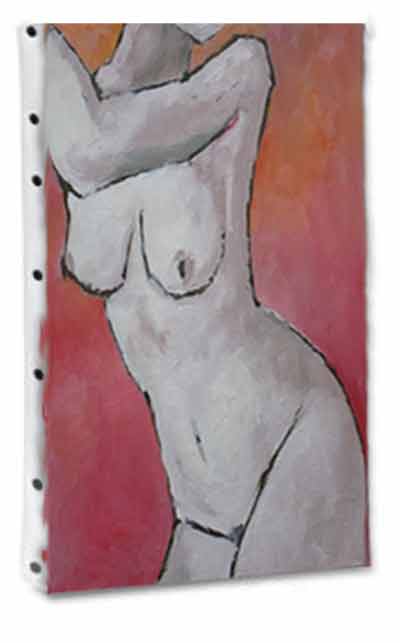
I envisaged a semi-glossed black color floater frame with gilded sections which should match perfectly with the colors of this oil painting on fiberboard.
Painting measures 10"x12". It is not a large artwork to frame. And the frame has for cost price: less than five bucks !
For the cost of the salt you eat the potatoes !!!
 Supplies to provide
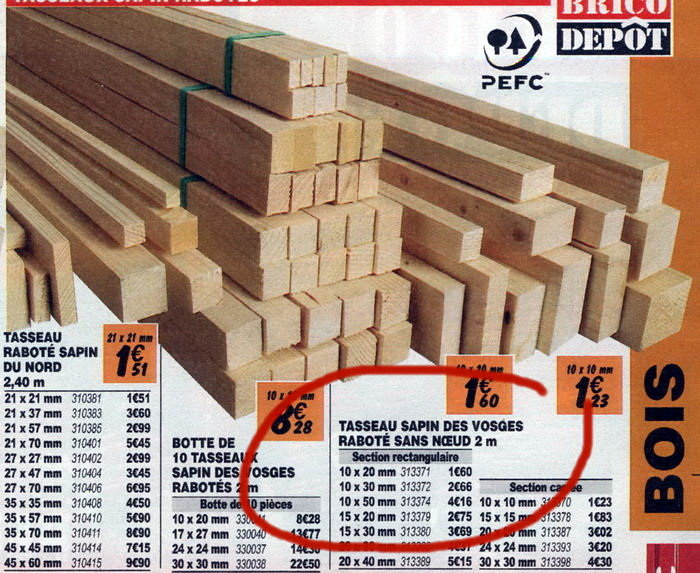
You need planed wood strip of 0.5"x1,5" and 0.5"x0.5". No problem to find that in DIY stores or in your local hardstore.
In France, we can find it in BricoDepot... They propose in their catalog under the denomination “fir tree strip from Vosges planed without nodes”.
If you're a handyman with power tools, you can buy some boards and length cut them to your dimensions. Or, better for saving money, cut these lumber in handing pallets boards...
You need 2 lengths of 80" in 0.5"x1,5" and one length of 80" in 0.5"x0.5" : the total expenditure is less than 5 bucks.
You also need woodworking glue - I always use Pattex external polyurethane glue which is perfectly appropriate but another fast woodworking glue works just fine. In USA there is a good glue for wood : TITEBOND... see page wood material !
A can of black satin-finish paint and a small can of gold metallic paint (found at "Leroy Merlin store" anti-rust paint department !)
Some screw clamps or better a Quick Adjust Band Clamp (see material), a hobby picture framer saw.
 Preparation of the mouldings
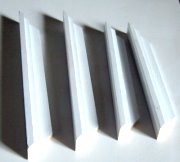
You have to assemble 3 strips to form the moulding of the Floater frame #3. It is better to proceed in 2 times to obtain a good tightening.
Coat the edge of one of the strips with wood glue and assemble it with the other cleat as on the plan.
Tighten the assembly with small clamps. You can also drive some little nails without inserting them completely. You will remove them when the adhesive will be dry.
Let dry one hour or two then glue the two faces of the 0.5"x0.5" strip and assemble it with the others. If you use Pattex polyurethane, put just a little bit… it is a very strong adhesive which expand a little while drying. Clamp firmly.
Here a photograph of the 3 assembled strips. you can see some small nails intended “to tighten” the assembly during the joining.

These nails were not entirely inserted : they will be removed when the glue is dry. They will leave a small hole on the side of the frame. It can easily be filled with a wood filler. Don't forget to sand carefully after drying.
Finally, You obtain a moulding like that :
 Cutting of the sides and assembly.
The art must “rest” at the bottom of the frame. It is thus necessary to cut the interior edges of the frame slightly smaller than the artwork.
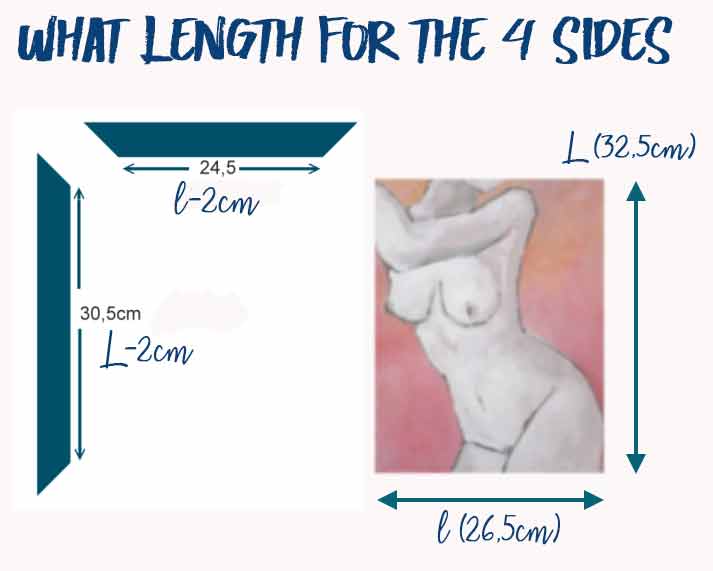
Start by cutting an end to 45° angle with your picture framer saw. Measure then 11" inside for the large bar and write a mark with the pencil. To be precise, regulate the stop block of your picture framer saw if you have one … (see the page “cut with stop”). Cut then with 45° angle on the mark.
Cut the second piece of moulding, using the stop or using the first one like a gauge to trace and cut..
Repeat the same operation for the two other elements.
You have now to sand with light sandpaper the parts of the frame before painting it. The best you sand the better will be the frame after painting.
When all is OK , you can paint a light coat of acrylic resin paint diluted with some water.
Sand again when the first coat is dry before going to the assembly.
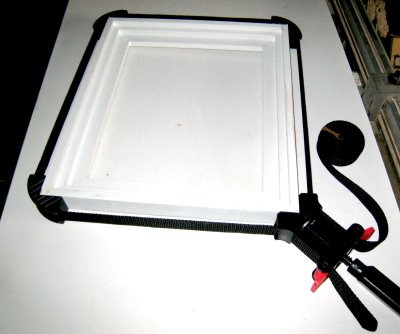
 Assembly the elements and completions
Take again the elements and glue their ends. Do not put too much adhesive in order to avoid the run-outs.
If you use the polyurethane Pattex glue, the excess of adhesive causes blisters which it is necessary to cut out and sand after drying.
Tighten the assembly during the drying with a picture frame clamp (this model is perfect to do the job) or put masses on the elements so that they do not move.
You can learn how to build your own frame clamp HERE.
When glue is dry, sand again your assembly and give it a first coat of semi-glossed black acrylic paint. Let's dry and sand again..
You can pass the second coat after 5H by giving before a small fine sandpaper blow.
After drying, if you wish it, you can “gild” the section of your American case. Very slightly soak a flat brush in gilded painting : it must be hardly moistened of gilding… and pass slightly on the edge of the external cleat. Do not cover the edge completely : leave only traces gilded on black painting.
Attention not to overflow on the sides ! If you are not on, stick a provisional adhesive tape for protect black painting on the sides.

Set your picture in your newly shiny frame, and maneuver it into the exact position you'd like. Take thorough measurements and notes on the alignment, space, and anything else that's relevant.
As the artwork I frame is painted on a fiberboard, I fix it with double coated adhesive strip on the bottom of the frame. If you've a painting on canvas, put it inside the frame and screw it across the back of the frame.
To finish, screw two small round pitons on the back of the framework. Install a wire between these pitons and hang your framework on the wall !
How to Make Your Own
Picture Frames
Ed Reinhardt, Hal Roger
Excellent book for the beginner. Clear and concise. Excellent step-by-step instructions with photos for each and every step.
This book covers all aspects of frame construction, painting, mats, glass-cutting and usage. A great book to trigger your own ideas to create custom frames.
Frame It!
by Tonia Davenport

Framing isn't something one has to leave to the professional.
With Frame It! readers will learn how to use ready-made frames and inexpensive framing materials to create frames perfect for their favorite photo, piece of artwork, canvases or souvenir.
Making pictures
frames in wood
Manly Bannister
Create all kinds of picture frames from simple wood mouldings to elaborate carved types.
Clear instructions on cutting texturing, finishing, matting,....