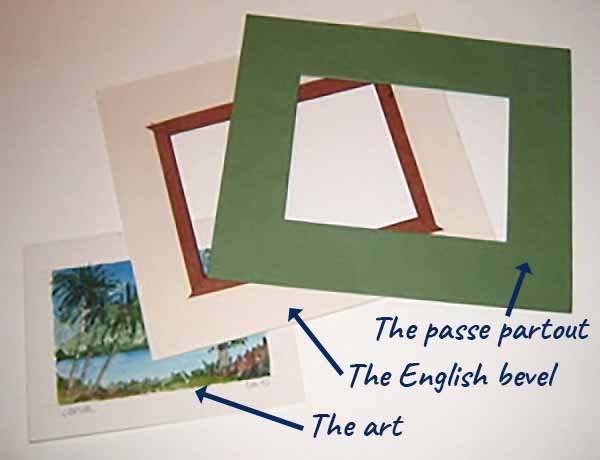
Framing a watercolour: THE ENGLISH BEVEL
(also called 45 ° bevel)
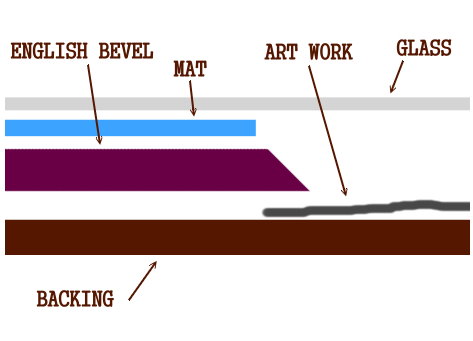
Like the straight bevel, bevel with 45° angle comes to be placed between the mat and the artwork to be framed.
Its interior edges, 45° angle cut, ensure the unit a maximum of depth and particularly emphasize the drawings or watercolours which it particularly well detaches on the mat the framing.
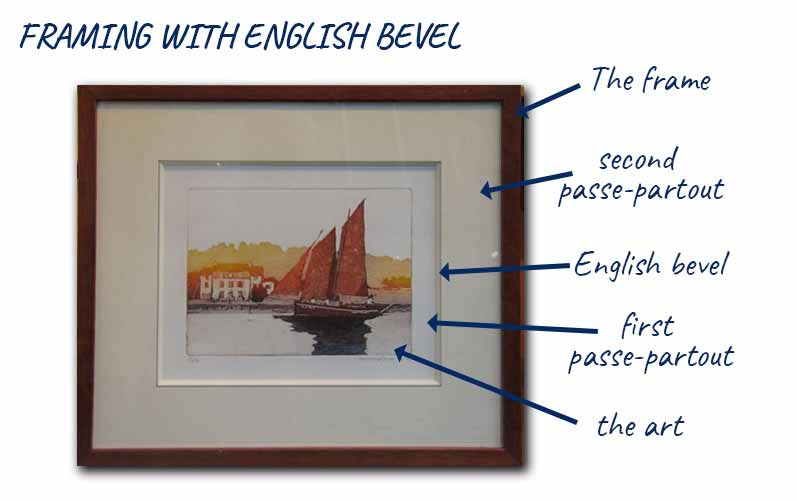
And, if we look "inside", we will find the different elements that make up this frame...
 A little more difficult to implement than the straight bevel , its cutting requires a bit of experiment or a special tool. But feel free to get started, you will not regret it!
If necessary, train you by cutting some off-cuts.
Again, you can choose between a ready made trade picture frame (which will require you some calculations to take account of the imposed dimensions ) or to make your "package" according to the the art to frame and then to cut frame and glass with your measurements.
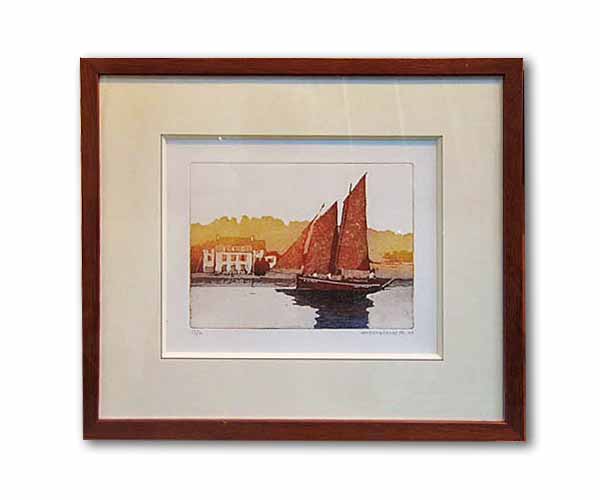
 NewCaledonia Island watercolour
Here is a small watercolor of a landscape of New Caledonia island and with a lot of green color. The painting measures 12x8 and is surrounded by a white border of 2cm (Total sheet measurements 16x12).

The opening in the mat will measure 14x10 (we call that image window). The mat overlap the 45 ° bevel , which itself will leave a small white border around the watercolor (see diagram).
For a better development, 45° bevel will be chestnut paper-cased which points out the rocks on the right. The mat, will be off-white or light green (I choose olive dark color, like the foliage of the coconuts of left).
 How to proceed
I will need thus, once the work completed, or to make a wood framework by myself or to to choose a moulding in a specialized store and order making of the picture frame and cutting the protection glass.
The opening in the mat : 14x10. I allow 4cm margins. So the mat measurements are : 14 +4 +4 = 22 cm and 10 +4 +4 = 18cm.
Cut the mat to these dimensions in a light paperboard and then draw with a pencil the margins (you can also use ready-made mat cardboard you cut to your measurements). Open the image window to 14x10.
As usual for mats, paste the cardboard with the green paper if you you don't work with ready-made mats.
Cut the backing-board to the same dimensions (22x18).
 How to make the 45 ° bevel
Cut out in foamboard or cardboard (2 to 3mm) the "English bevel" to 22x18 (same size as the mat). Place the mat on the french bevel, and using it as a template, with a tip or pencil, mark the location of the opening.
We arrive now in the delicate passing... We have to open the bevel window giving a 45° angle to the cutter (see on the picture how to hold the cutter bended on the rule)
If you have difficulty cutting to 45 ° (like the vast majority of beginners in picture framing ...), use the Mat cutter MAPED and its sliding tool with 45 ° angle... (see special page LOGAN TOOLS or Logan Compact Deluxe Mat Cutter Model 350-1
You can also refer to our technical page: the 45 ° bevel of this site.
Position the ruler on the location of the window. Tilt your cutter on the edge of the steel ruler.

Do not try to cut in only one cut... more we support and more the blade tends to deviate! Press moderately and cut in several times .
Feel free to go beyond the corners of 1cm ... All this is then paper-cased and so the cuts will be hidden!
Cover with a brown paper reminding one of the colors of the watercolor the inner edges of the 45 ° bevel .
For that, cut in brown paper 4cm wide strips and fold them in half. With 45 ° angle, cut one end.
Put the folded band in the bevel and mark the other end. Cut again to 45 ° with the set square.
Glue the face of the bevel and paste the strip, then turn on the reverse, and apply glue on the strip stretching out the paper on the bevel.
(for these wrapping techniques, you can refer to page the 45 ° bevel )
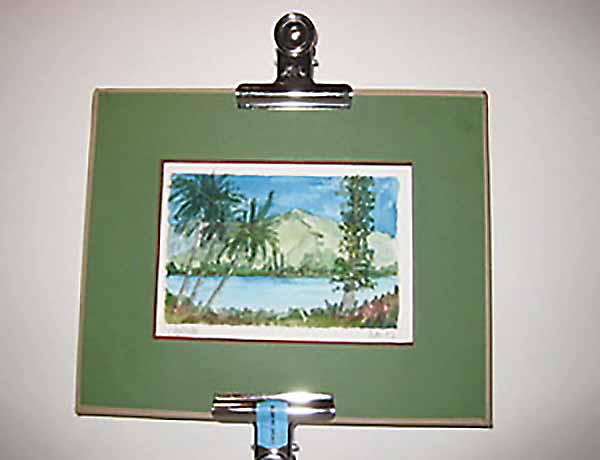
 Mounting
On the backing board, fix the watercolor with small pieces of adhesive tape. Cover with the English bevel, on the top finish by the mat.
Align properly and secure temporarily with clamps.
In the roll of brown paper gummed tape, cut 4 strips to close "the package".
Start by pasting the mat overflowing with 4mm maximum. Then fold the sides and then glue them on the cardboard background. This Kraft brown tape will be invisible thereafter as masked by the rabbet of the frame.
Bring now the package to your framing store to select a moulding and trim a glass ofPSD protection (always preferred to an ordinary window glass because non reflective glass are expensive and not perfectly transparent!).
NB : Many picture framers include the pane glass in the package. This makes all dustproof and doing so, insects cannot invade between glass and art ...
Mat, mount and frame it yourself
David Logan

An attractive, well-designed frame not only enhances a picture but preserves and protects it. Logan, a contributing editor at Artists' Magazine who has taught framing and matting across the United States, shows readers how to present their artwork skillfully and economically.
Basic picture framing
Amy Cooper
This detailed guide covers the essentials the beginner needs to get started with matting, mounting, and framing everything from works of art to personal mementoes.
It contains practical techniques and expert tips on choosing the proper matboard and frame; measuring and cutting single, double, or triple mats; safely mounting your materials; building frames; attaching hanging hardware; and placing the frame for display.