How to build and cut an oval mat
for a clip photo frame
 Drawing an oval... the problem !
A mat with an oval window brings a touch of romanticism to your framing. It agrees particularly with old pictures, flowers, landscapes with pastel and shade colors.
It can also be resolutely modern if the colors which you choose for his preparing contrast with the photograph or the drawing which you frame.
But how can you easily draw a perfect oval ?
 The example
We have a photograph which measures 4.4"x6" and a clip frame we bought in a framing shop. The clip-frames measures 7.2 "x9.6". There are standard measures in France... for other countries you have to adapt dimensions to your personal case.
To compute the margins, I take photo dimensions away from clip frame measurements. The part of the photograph we want to show are: 4"x 5.6"... margins on sides will be of (7.2 - 4) / 2 = 3.2 / 2 = 1.6" and of (9.6-5.6) / 2 = 4 / 2 = 2" on top and bottom.
Unequal but symmetrical margins are not a problem with an oval mat.
 Cuttings
In a paperboard sheet (for example cardstock), cut out the mat to 7.2 "x9.6".
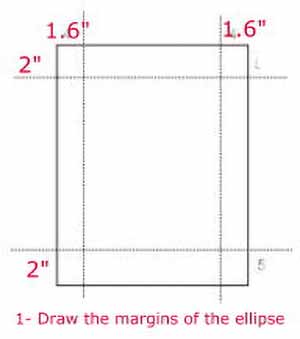
On this mat, an ellipse should initially be drawn respecting the selected margins.
You can re-examine in the TECHNICS PAGES: How to draw an ellipse if the following explanations are not very clear.
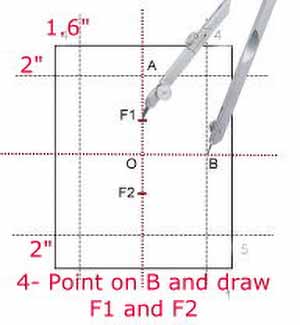
On the mat initially trace the margins to your measures
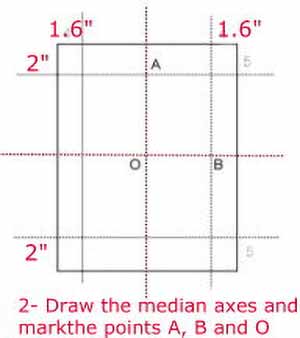
Then draw the medians Which are the axes of the ellipse. Locate the points A, B and O.
Then, with the compass, take spacing OA.
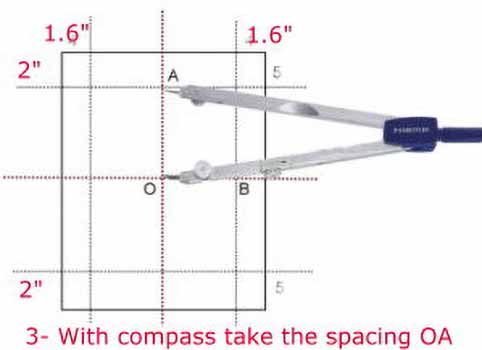
Prick now on B and, with the compass, draw successively F1 then F2 on the main axis of the ellipse.
Whew ... it is finished for the drawings! End of mathematics ! OUF !
Place your mat on a thicker paperboard, prick two pins with rounded head in F1 and F2 and, with a sewing thread form a loop Which locks up the two pins.

Tighten the loop towards A and make a node exactly on A when the loop is taut. Before tighten it, you can (yes !) regulate the node with a pin ... It is more difficult to explain than to make!
You are now ready to trace the ellipse. With a pencil, tighten the loop slightly and trace by maintaining the loop tightened : the ellipse is formed quite naturally. You will see that it is true ... it passes exactly by the envisaged points!
Now, remain to cut out the oval with the cutter while following the layout carefully. It is not most difficult!
 Preparing of the mat
In order to contrast to the maximum with the slightly orange tone of the photograph, I chose a paper with blue darken grain.
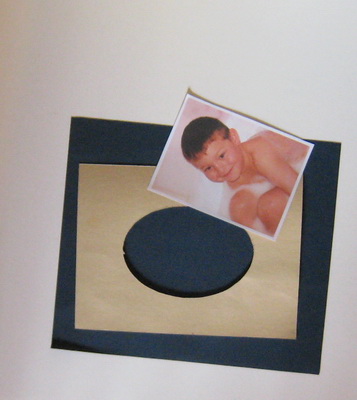
Cut out a rectangle larger than the mat for covering it.
Paste the back of mat uniformly, then stick the blue paper on it.
Cut out with the cutter the flaps which will be folded down the mat.
Fold up the flaps and stick around the back of the mat. For the mat opening, it will be necessary to cut out the cutter with a series of small flaps to be folded up.
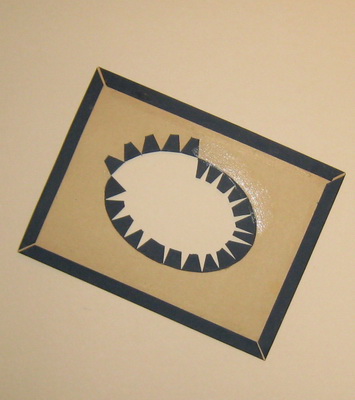
You can see these flaps of "rembordage" on the photograph. The more you will have flaps and the prettier will be the oval mat. In this example, I made less flaps than necessary to have a pretty good mat. It was just to understand the technique.
And do not forget that it is always better to paste the paperboard rather than paper (some papers have tendency to warp and wrinkle when they are wet).
You now have to finish the clip-frame mounting : on the fiber backing, in the middle, fix the photograph with a few small pieces of adhesive tape.
Put the mat: check for the photograph is well placed.
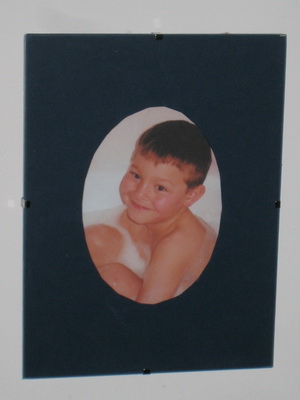
Clean glass carefully. Pose and finish it by fastening the clips which maintain the unit. Hang your frame !