How to frame a picture
Exceeding strips technics
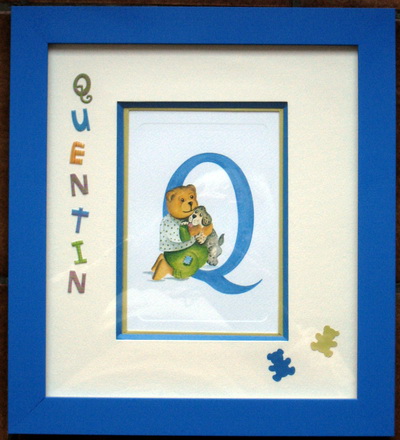
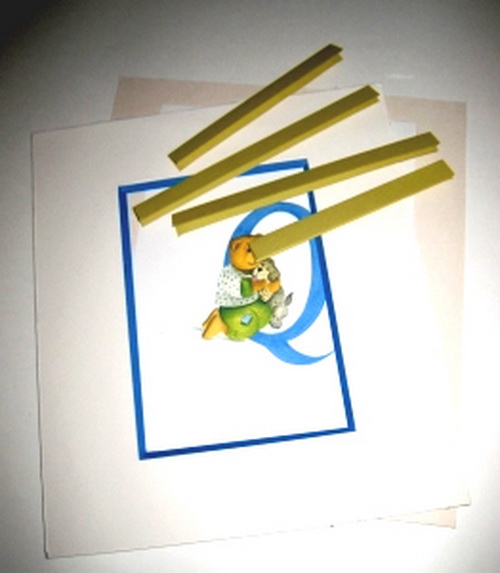
It's a picture frame intended for a young boy : Quentin. I've found a Teddy Bear image playing in the Q letter …
For a better enhancement of the art, I chose to surround the picture in its frame with a "dépassant"... i.e. a sort of exceeding strip border made of colored paper and glued under the "bevel".
We must therefore carefully choose the color of this paper strip !
 The picture to frame
The picture is printed on a white zone and is surrounded by a small hollowed line stamped in paper...

For well emphasizing this picture, it is necessary to mount it with an english bevel which has a 45° angle bevel (see the bevel 45° page), this "bevel" will be underlined by one exceeding coloured strip, the "dépassant".
Quite naturally, We will equip the bevel with a blue paper (which just match fine with the color of the "Q" letter ). The exceeding band will be treated out of olive-green colour as a remaining of the color of the Teddy Bear's trousers.
 Measurements
It is necessary to measure the part of the artwork you want to show… 7.2" long and 5.2" width : there will be dimensions of our Picture-window. All dimensions depend on this picture window!
The margins are equal and will measure 2" (5cm) in all directions. The mat measures are given by the formula:
PictureWindow + margins = the dimensions of the mat
7.2" + 2" + 2" = 11.2 " and 5.2" + 2" + 2" = 9.2" (approx 28x23 in cm)
 The cuts
Cutting the card board
In thick cardboard, the bottom cardboard is cut with a cutter at 28x23, in a light cardboard (cardboard box) the passapartout (the mat) and in a thick cardboard (feather cardboard) the bevel cardboard at the same dimensions.
Using a pencil, trace the window on the mat and then open it with the cutter.
Place the passe-partout (mat) on the cardboard for the "bevel", carefully align the two elements and then, using it as a template, trace with pencil the part of the bevel to be cut out.
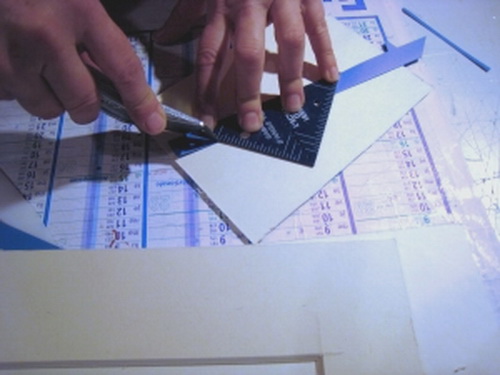
Now let's cut the bevel: place the blade of the cutter at the beginning of the cut on the line you have drawn. Tilt the cutter blade 45°. Place the flat ruler against your blade, align it well.
Start your cut without pressing too hard, keeping the blade at a 45° angle: it will take several passes of the cutter to finish the cut. Don't hesitate to overtake in the corners: the bevel you create will then be dressed.
If you are not tooclever with your hands, and hesitate to hand-open bevels with 45° angle … make like many at-home picture framers : use MAPED or LOGAN mat cutters (have a look on their special page) and their 45° cutting tool … they work just fine and it is so much simpler!
When you finish cuttings, you have in your hands the back paperboard, the bevel with 45° angle window and the mat. Now remain to equip them!
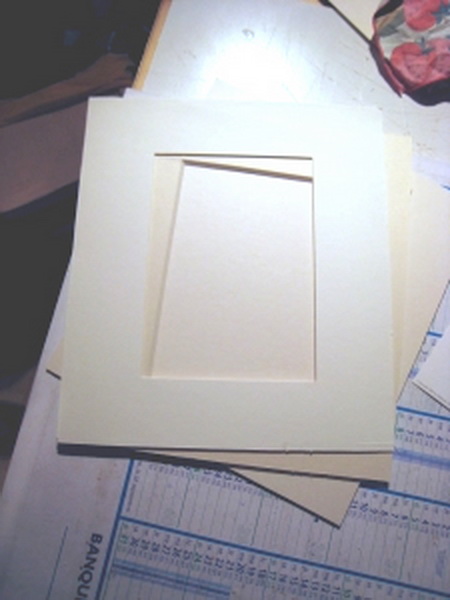
Dress the bevel as well as the mat.
Now, you have to equip the bevel paperboard by masking the inner edges with special printed paper. To do that, cut out 4 blue paper strips of 2" width which will correspond to the 4 sides of bevel.
I chose this blue color as a recalling of the color of the letter "Q" of the art.
Bend double these bands in the length. Crush the folds with a bone folder .
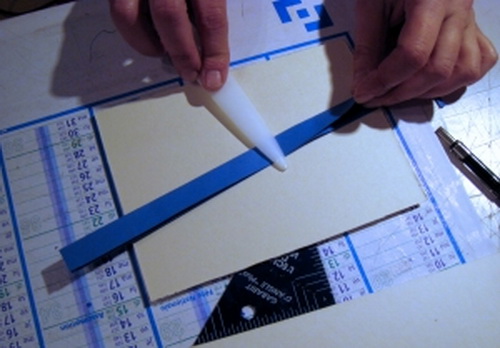
With a square with 45° angles, cut an end of the folded bands to 45° (two thicknesses at the same time… and be careful at the angles)
Present a first blue band against the interior of bevel, mark the length with a fine pencil then, with the square, cut its second end to 45°angle.
Test your band which must overlap and to adapt exactly inside bevel. Possibly recut.
Prepare, in the same way the 3 other bands. Then stick them to equip the edges of the bevel.
Install the exceeding strips
To accentuate the depth effect, you now realize what we call “exceeding strips”.
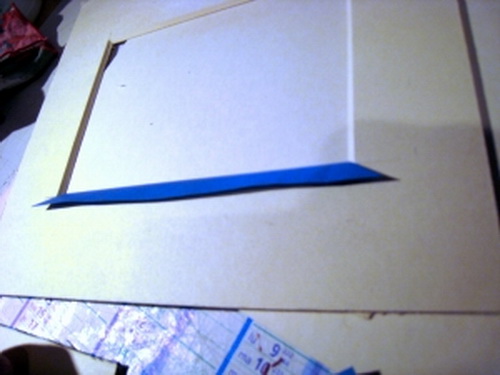
The selected color is the olive green : Cut 4 paper bands of 2" and bend double them.
I chose this olive color that reminds me of teddy bear pants...
Stick these exceeding behind the blue edges of bevel by letting them exceed 1/8". With the cutter and the 45° square, cut the ends to 45°.
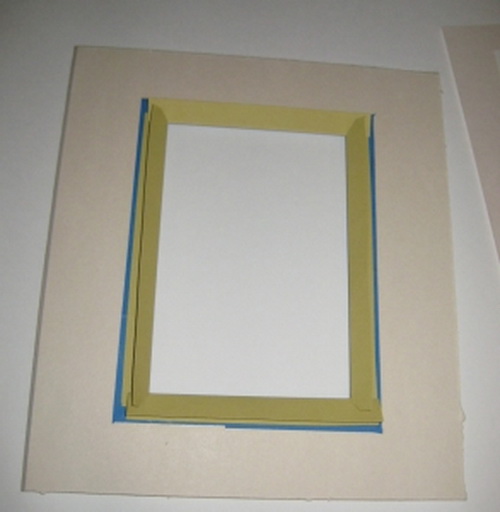
This photograph represents the back of the equipped bevel ! You see bevel with 45° blue paper equipped and green olive exceeding stuck on it.
The mat, equipped with cream coloured and grained paper, is posed on the bevel and the whole on the back paperboard with the art word sticked on it.
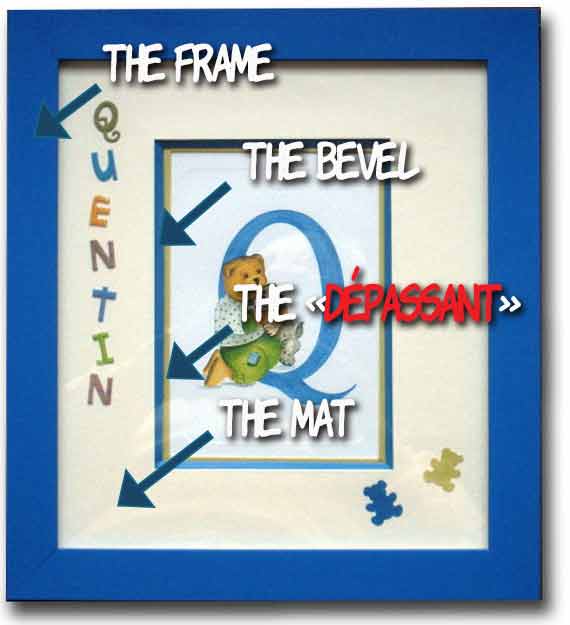
To finish the framing, I've added some self-adhesive letters (“PUFFY STICKERS” from Provo Craft) the name of the child for whom this artwork is intended.
With a small punch, two small silhouettes of "nounours" (french Teddy Bear)…
Cut a glass (11.2"x9.2") … and the moulding was cut and assemble in a art-store and its color was especially selected to match with the color of the bevel.
See that page how to make the "PACK" to put inside the wood-frame
It's over!
Logan Home
Picture Framing Book
by Logan
One of the best book you can have...
The Complete Guide to Home Picture Framing contains ninety-two pages of black and white photos and illustrations that cover all aspects of matting and framing using Logan mat cutters and Logan DIY Framing Tools.
A must have for all at-home picture framers. 8.5x11. 92 pages.
How to Make Your Own
Picture Frames
Ed Reinhardt, Hal Rogers
Hal Rogers and Ed Reinhardt are eminently qualified experts on picture-framing-both from the craftsman's standpoint - They have been making their own handsome frames for years - and from the esthetic standpoint-both are accomplished professional artists.
It's the 3rd edition !