FIRST PAGE IN SCRAPBOOKING :
SOME ADVICE FOR BEGINNERS
With Audrey from "Créations d'Aurecia"

![]()
How long have you been scrapping?
It's been 7 years now. I discovered scrapbooking during a trip to Australia on a magazine, the concept immediately attracted me: to give "life" to photos by telling "their story" by highlighting them with decorations, I loved it!
What do you prefer to do in Scrap?
Everything! I like to "scrap" all kinds of albums or supports, to try and mix new techniques. In everything I do, "scrap" stands out! It can be adapted to all kinds of creations.
What are your favorite colors ?
I don't really have any favorite colors, it all depends on the photo and the style I chose. But there are some colors that I work with more than others, for example pink, green, purple, blue, yellow, I use less often brown, black, red colors.
What does scrapbooking bring to you?
To be creative! Before, I didn't dare to be "creative" when I was doing manual creations. Thanks to scrapbooking I dare to express my creativity more! I add elements, I customize, I use different materials, I mix several techniques in short I leave room for creativity and this feeling of "freedom" is a real joy to create.
For me, scrapbooking is also an original and attractive way to stage the important events of my life, to tell the present and past "story" of my family and above all to be able to pass on these "living" photo albums from generation to generation.
Contact: aurcia@orange.fr
Visit AUDREY's website:
ADVICES FOR BEGINNERS
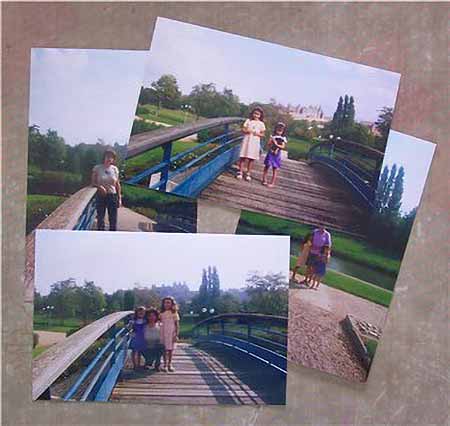
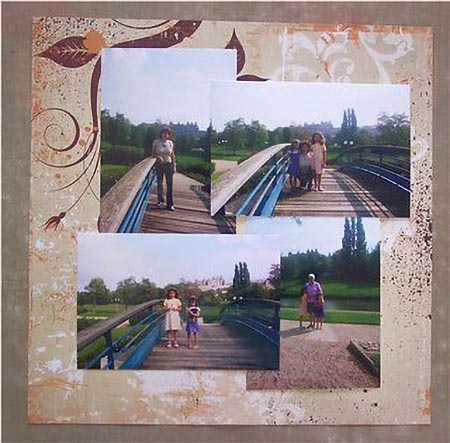
 Sort photos
Sort your photos if you have more than one on the same theme. Keep only the photos where you see all the people, or the most beautiful ones, or the ones that will have an anecdote. If you have a lot of photos left, you can make a double page.
 Choice of paper
This is the most difficult step, which papers to chtry to think of a style you would like for your photos: romantic, antique, masculine, feminine, bright colors or pastels.
On the color side you can go with the environment of the photo: for example green for the countryside or garden, brown or blue for the beach, the sea.
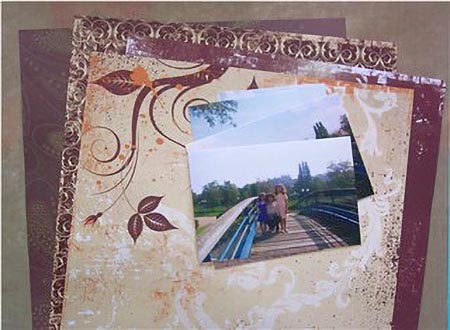
Or the colors of the clothes of the people in the picture or of a particular person yo
Once you've decided on the style. Then take a photo and position it directly on the papers, so you can see if you like the "marriage" of the papers with the photo.
To make a page in scrap, we generally use 3 to 4 papers (this is an average, you can, of course, use more or less paper to create a page).
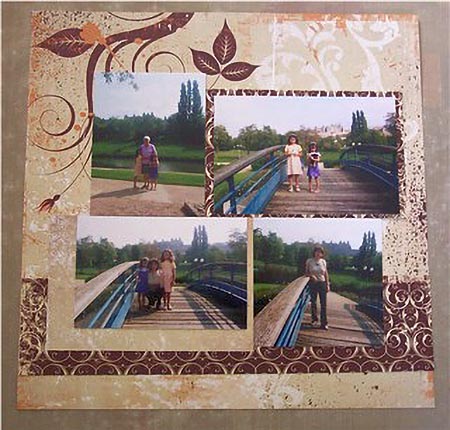
 Layout
Placez vos photos sur votre page, laissez un espace pour le titre et le journaling (commentaire). Essayez de « regrouper » les différents éléments sur votre page, cela vous laissera de la place pour mettre des décorations et votre titre.
Beginners oftene photos on the edges of the page, to be avoided absolutely.
When you look at a nhat it is about thanks to the title and the photos. If you put photos at the 4 corners of your page, at the edge, you p>Then you look at the details and read the journaling. Take a good look at the pages of the experienced ones, you will see that as a rule the elements are grouped together and not scattered all over the page.
Since I don't have much space left on the example page, I will write the journaling around a photo.
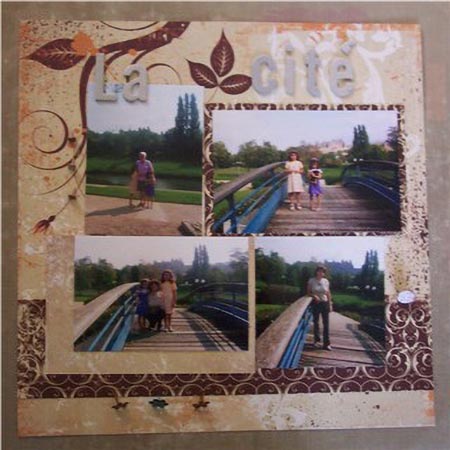
 Photo framing
Crop your photos by cutting out what is useless: dark or black places, too much sky (as in the example), strangers, walls, things you can see on another photo that will be on the page (no need to keep duplicates).

 Matting of photos
In scrapbooking, we do not frame the photos but we "matt" them, that is to say, we put one or more papers under the photo.
Here again, it is up to you to decide how wide you want the paper to protrude all around the photo. Tip: to enlarge a photo, leave a wider border around it.
You can have several matt: the one on the top right and the one on the bottom left.
For the bottom one I left a bigger border on the left side, that's where I'll writebelow, I have changed the initial location of the >After cropping the photos I preferred to change their location, this often happens when you scramble a page to change your layout as you place the different elements on your page.
That's why I prefer to paste or fix everything once I'm satisfied with the final result.
Then place your different pieces of paper. They can be of different lengths and heights.
Once again, place them on your page and start cutting out one, then another, placing them on the page each time.
Each piece of paper should touch another piece of paper or the photo in order to have this "bundled" effect. For my page I cut out a strip of paper and placed it at the bottom under two photos.
 Title
Title
Place your title, it must be clearly visible, neither too big nor too small. Be creative with your titles!
You can embellish them by adding decorations, painting them, embossing them with powder, matting them...
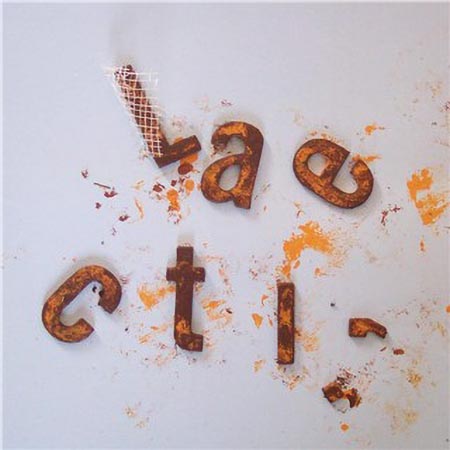
I chose chipboard letters for my page.
I painted them with different acrylic colors with a sponge...
Here is the title in chipboard (cardboard) reworked with acrylics :
 Decorations and gluing
Place your decorations. I embellished the first letter of my title the "L" by adding a piece of tabacca (net) and a flower fixed with a Parisian tie and underneath I put skeleton leaves.
I added a ribbon at the bottom with some Parisian flower ties. On the left, above, I placed two small Parisian ties and a button (fixed with a dot of glue or glue dots).

Some scrapbooken place your journaling that you will have printed with your computer ordwritten by hand.
Since I didn't have much space left on the page, I decided, as indicated above, to write my diary by hand around a photo where I also put the date.
Once you are satisfied with your page, once you have balanced the colors, the decorations, the people on the pictures, all you have to do is paste everything!
To gluetical because you can always remove your paper or photo to reposition them.
You can also use glue dots to attach button-like decorations.
Each scrapper has her own style and when you start, you're usu not very sure of your page. But tell yourself this, if you like your page, that's the main thing!
You enjoy yourself above all and that's what's important. Scrapping is a REAL PLEASURE because you are scrapping photos: your photos, your children, your family, your pets, your garden...
You create a real album of memories of the "history" of your family. A photo album that is attractive to leaf through even for strangers.
You can also make mini albums of all kinds to offer them to your family or friends. Gifts that are sure to please, photos that are always a pleasure to receive!
And to conclude...
To help you get started in scrapbooking and gain self-confidence, you can make "scraplifts": i.e. copy a page made by another scrapbooker.
Scraplifts also allow you to change your style and make layouts that you would never have done before, experienced scrapbookers also have fun doing them.
All about getting started in scrapbooking, scrapbooking materials and tips.
