TECHNIQUE : THE ENGLISH BEVEL
Give depth to your framed pictures
We call "bevel" a kind of thick cardboard passe-partout (between 3 and 5 mm) that comes between art and mat. The inner edges of this bevel are covered with decorative paper in colours that match that of art.
This assembly gives depth to the frame and highlights the art in particular.

 Preparation process
For this page about the technique of bevel with 45°, I chose a simple, low-size example : the frame has as measurements 4"x5.2" and the margins must have 1.2".
First, I cut a rectangle 4"x5.2" in a foamboard sheet. Then I draw the opening (for well seeing this window on the photographs, I traced it with a black felt!).
(For the purists… one normally traces the opening on the back of the paperboard and have to works on the back… by reversing the direction of bevel… but it is here only about initiation…)
 Cutting the bevel
Bevel with 45° will be cut out with MAPED* ruler or a LOGAN matcutter: this one is composed of a ruler provided with a slide and a cutting tool which can coast in this slide. Of course, this cutting tool is automatically sloped with 45° angle.
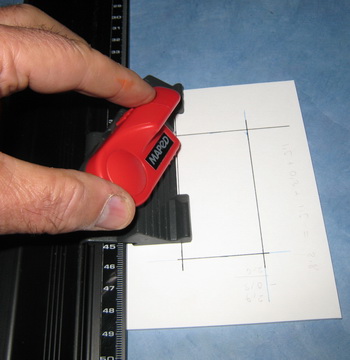
Position the ruler so that you can see line of cut to a half-millimetre of the small window in the cutting tool (see photo). Slide to test the cutting tool without supporting and check for the good position of the blade.
To cut, start with 0.4" apart from the marks and push down moderately : it is better to pass 3 times and to obtain a clear cut than to force and make the blade deviate. The foamboard cuts out however easily!
If you do not have a MAPED ruler or a LOGAN matcutter (the 301S is a very good one !), work is a little more delicate. It will be necessary for you to cut the window by sloping the blade to 45° angle (it is always approximate… the practice of the cutting tools allow to succeed without too many problems. Train yourself to cut offcuts !)
After cutting out the 4 sides, the opening is finished. Pass possibly a fine sandpaper on bevel to remove small possible slivers and scratches.

It is now necessary to cover this 45°-bevel with printed paper bands well matching with the artwork to be framed.
(*see special pages MAPED TOOLS and LOGAN TOOLS)
 Covering the bevel
For that, cut out bands of 1.5" width the paper you chose. Fold these bands in length in two unequal parts (look at the photograph: for 1.5" the band, 0.9" for one and 0.6" for the other).
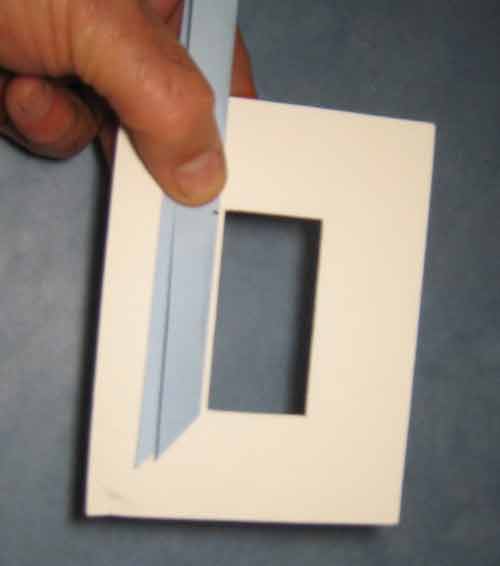
With the 45° square cut the end of one of the folded bands to 45°. Maintain the band folded, turn over the bevel and apply the band along the interior edge (look photo above) . Mark with a pencil the length to be preserved and, with the square, cut again with 45° angle on the mark.
When you open them, your bands must look like those which are reproduced on the following photograph.
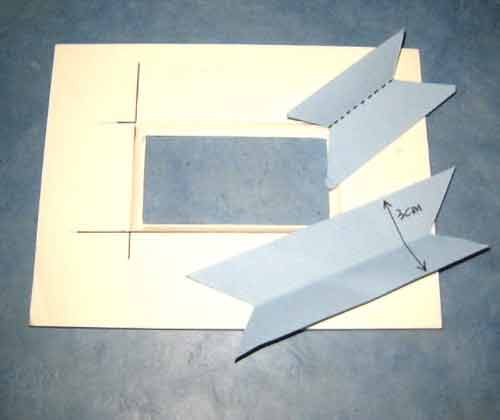
(on the small band, I traced in dotted lines the fold who determine two unequal bands - on the other tape, I marked the width to 1.5")
Spread out adhesive on the bevel face up. Apply the first band while making coincide the acute edges of bevel with the fold of the band.
Now turn over bevel to back, face on the table, paste the edge of bevel. By tightening the band with the fingers, apply by checking the angles.
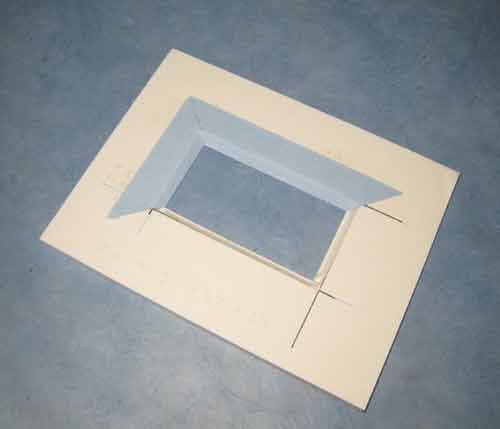
Continue with the other bands to cover the 4 bevel sides . If the measurements was good, the angles must be perfectly jointed.
There is no need to try to completely cover the bevel... since the mat comes to be placed above and thus covers most of the bevel.
Your English bevel is now finished! See this page : English Bevel to use the technique.
Frame It!
by Tonia Davenport

How to Make Your Own Picture Frames
Ed Reinhardt, Hal Roger
Matting and framing made easy
Janean Thompson