
How to align your frames
A great and free small tool !
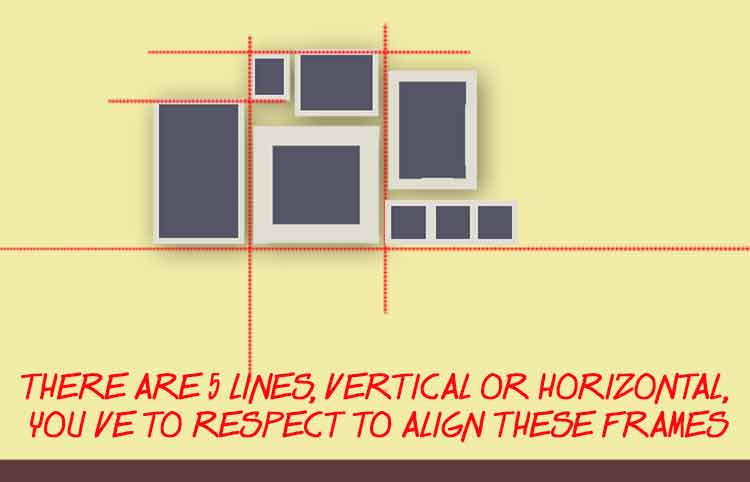
You decided to group your picture frames and make with them a full decorative element of your home...
Then appears immediatly the problem of aligning and spacing them in an aesthetic way ! Look at the picture ... Since they are perfectly aligned these frames !

 A SMALL and ALMOST FREE GREAT TOOL !
For a few cents ... you'll be able to DIY a small tool of biblical simplicity that will prove very useful when you hang your paintings or pic frames on the wall.
A wood strip 3cm wide and 50cm long ... a halfway down 5cm nail... That's all ! And with that, you make all possible adjustments : up and down but also right or left !
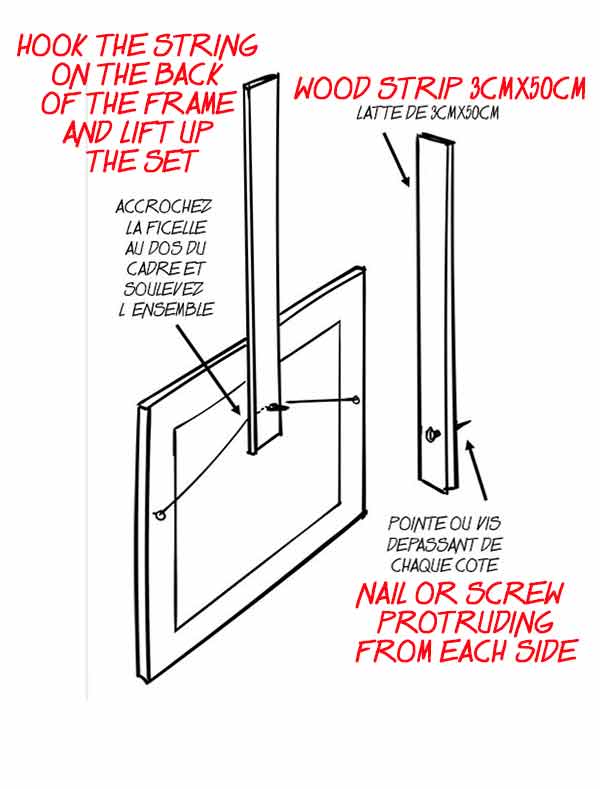
Put the tool behind your frame ... Hook the string or the ring on the nail ...
Hold the set with the strip end and move on the wall.
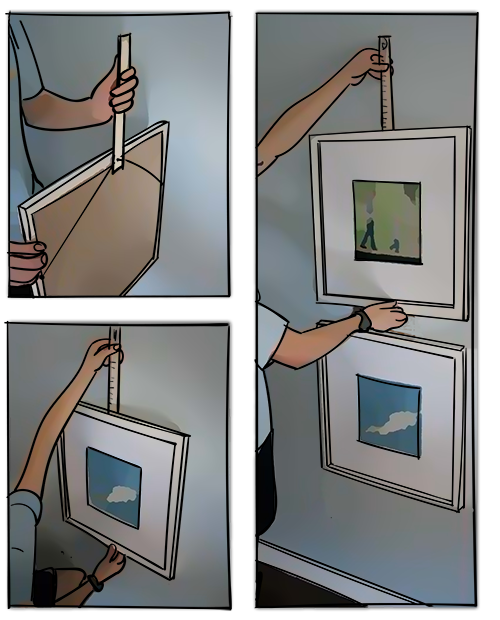
When your frame is properly aligned ... press a little harder the strip against the wall ... the nail then left a small mark on the wall... it is the EXACT place where you have to put the hook!
Obviously, it's easier if you are two people ... one that moves the strip and the frame, the other that looks and guide ..!
Quick tip ... It is often necessary to materialize the base line to properly align the frames ... here's how ...
Materialize your horizontal line (or vertical) by pricking two-headed pins in the wall ... then stretch a sewing thread between these two pins. When finished, remove the pins: the holes are not visible!
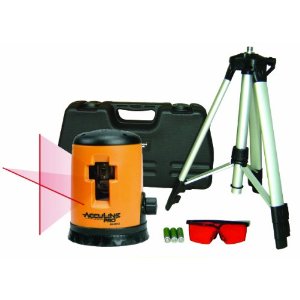
And if you prefer to purchase this tool ready to use ... Here is a link where you can buy it for less than $ 5 ! This tool is called PICTURE PLACER...

This tool do the same job the DIY tool above... but easier !
And look at this video to know how it work !
 GRAND LUXE... LEVELLING WITH A LASER
If you are a confirmed handyman (or will be), if you have a country house you renovate ... so why not invest in a laser level!
There are in all price ranges (from $20 ... but I do not advise you because they are not the most practical nor the most accurate (except the Magnusson one) in all brands.
Some of them only project red points (not very interesting for our case) while others are rotating ...
To perfect align your frames, you must prefer those projecting a cross, two simultaneous lines, one vertical and one horizontal like the very handy HYCHIKA (less $40)
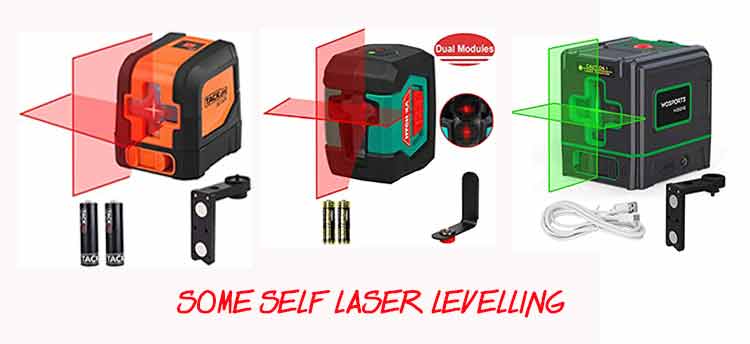
Prices are from $30 to $50... Have a look at this page. And they're self levelling !!!
Just then projected onto the wall the "cross" base, the horizontal line that intersects the vertical line, and align the edges of the frames (or their middle following the lay-out you choose). It's too simple and even you alone can easily align the frames on the wall with this system.
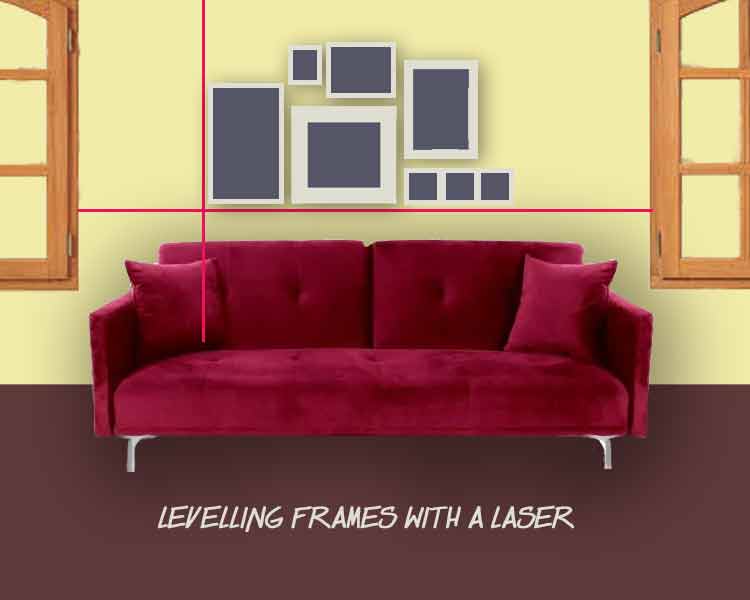
Again, the small alignment tool described above will be of great help! Your alignment is projected onto the wall and you move your frames with the strip until they find their proper place on the red lines.
Obviously, a laser level can be used in many other circumstances to DIY a tiled floor for example, it is perfect to start well plumb the front row! If you have to install kitchen units ... Again the laser will be useful to align perfectly the edges of the wall units ...
Another use ? Yes, installation of wallpapers ... This saves you to use the plumb line (the cord is always messy and full of knots!) and ensures the verticality of your first strip! And if in addition you have to install a small pool, well horizontally in your garden ...
I found in AMAZON Store this very affordable model of Cross Line Laser Level Kit very complete with its telescopic elevating tripod, special glasses... ready to use for less $90 !
 How to get always straight frames !
 A handy little trick
Your frames are perpetually wrong ... Every time you go ahead, you straighten them ... in vain because the next time it's the same thing!
To have straight frames, you first have to prefer the strings for attaching to the rings. It is always possible to adjust a suspended frame using a string!
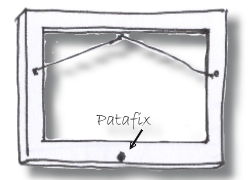
Then, to avoid them to move alone, put a small pad of "patafix" behind the frame, in the middle of the bottom molding. It will not move at all!
If you do not have a patafix, fold a piece of tape 3 times on itself and paste it at the bottom of the frame in the same way. You can also use a small piece of double-sided adhesive ...
 The SILICONE BUMPERS ...
You can also use SILICONE BUMPERS PAD stickers , kinds of small silicone non-slip that are fixed by simple pressure ... They are also used as noise dampers on kitchen doors ...
One on each side of the base of the frame ... and it will not move, always horizontal! And as a bonus, the edges of the frame will no longer damage your walls!

A book for decorate home...

Suzanne Kasler is well known for her classically inspired rooms, pretty palettes, and comfortable spaces...