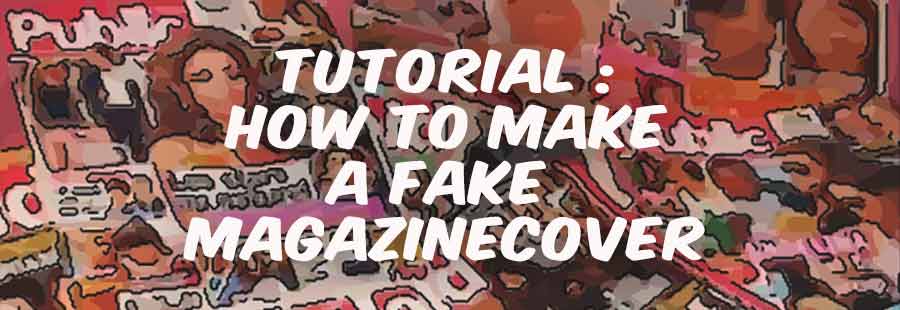
MAKE A FAKE COVER OF VOICI
How to create a fake magazine
NOTE :This page is dedicated to the European magazine VOICI... CLICK HERE for a fake cover of PEOPLE mag!
 Birthdays, anniversaries, weddings...
Give the gift of fame!!! An appreciated gift...
You deserve to be on the front page of your favorite magazine... and yet you've never been on the cover! It's high time to make up for this grave injustice and take your destiny into your own hands!
In short... this page to explain you how to create yourself these pages of fake magazines that you can slip into your personal album or offer to one of your loved ones...
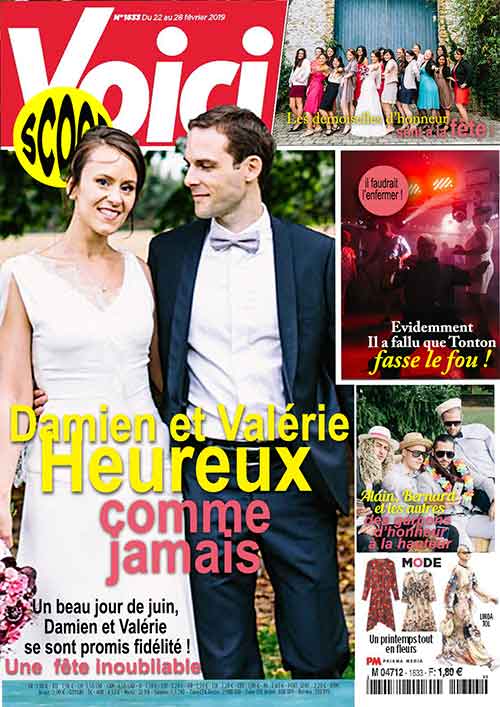
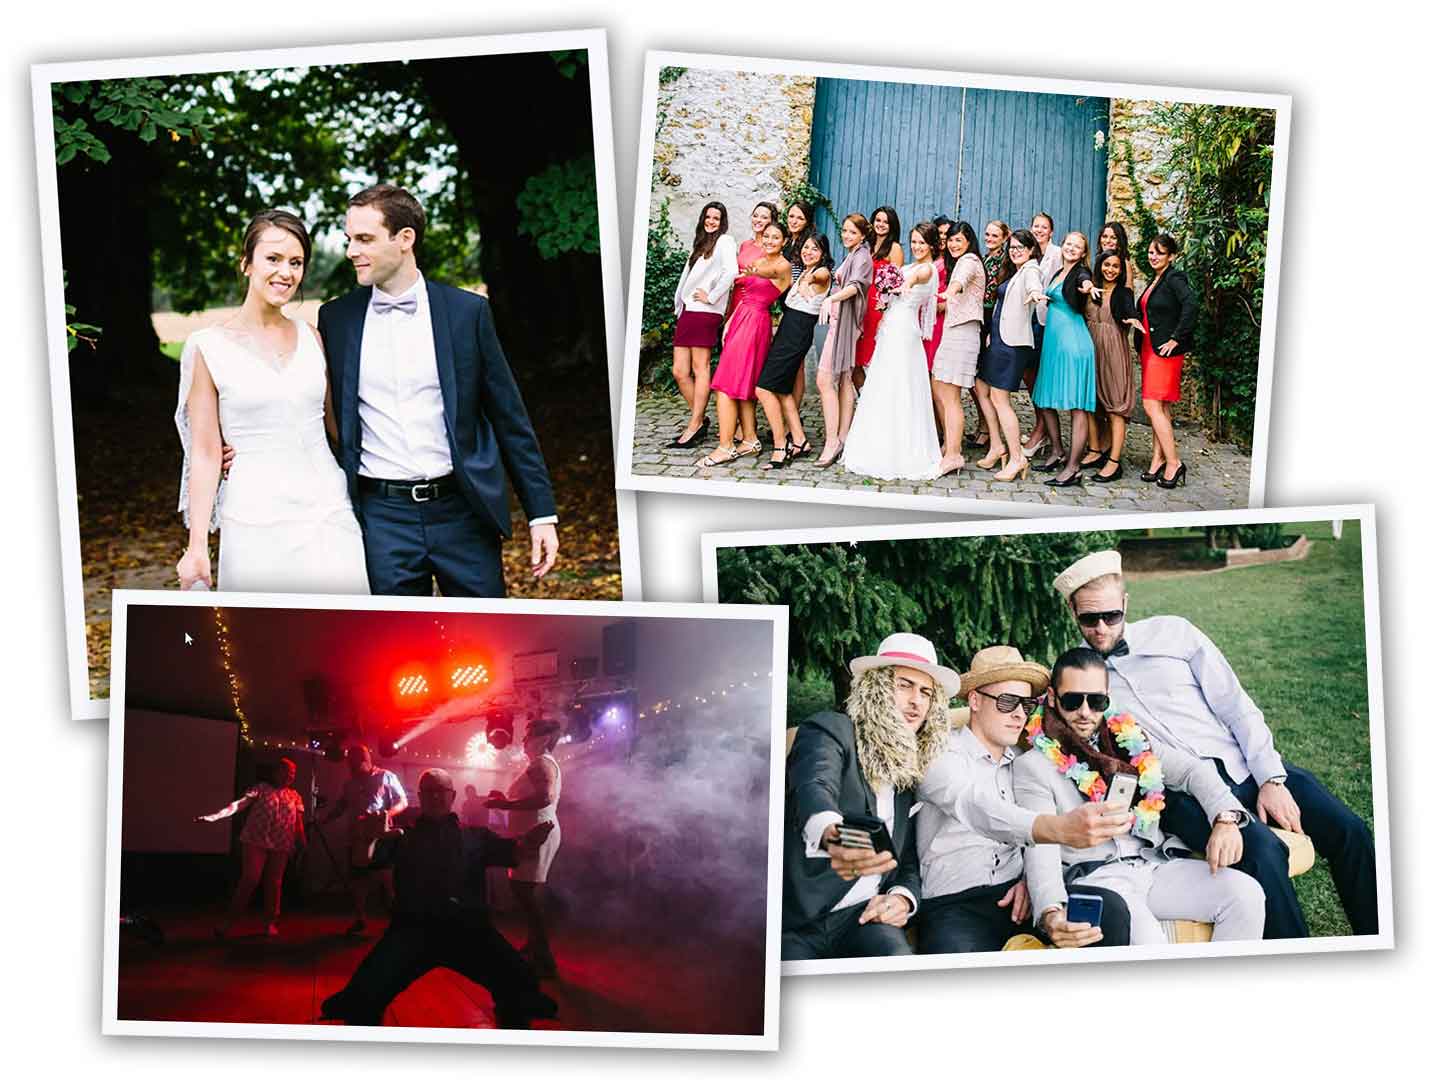
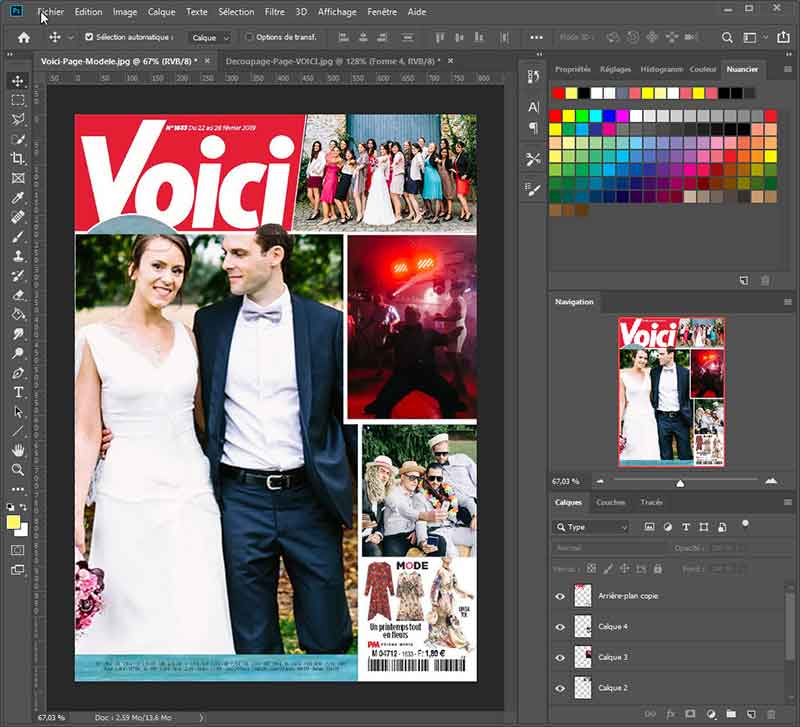
Here is the fake page of a magazine offered to Damien and Valérie for their wedding: it was even printed on a canvas frame more easy to display!
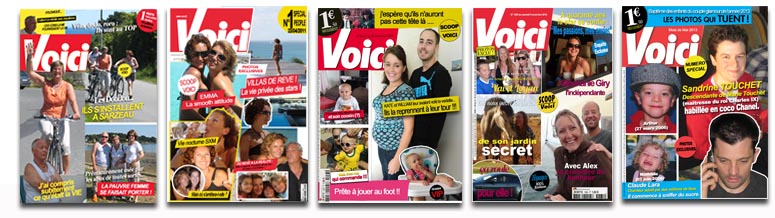
 Analysis of the front page of a magazine...
We have chosen to imitate VOICI magazine whose eye-catching "FRONT PAGE" catch the eye in the newsstands ... The analysis we make is easily transposable to another magazine.
How do you recognize the cover of VOICI at first glance?
To begin with, the white logo on a red background... of large size and therefore perfectly visible.
Then, the layout of the images: generally 4 photos on a white background, some of these photos have cut-outs that interfere with the titles and on those next to them, for example, the characters in the main photo often spill over the title ...
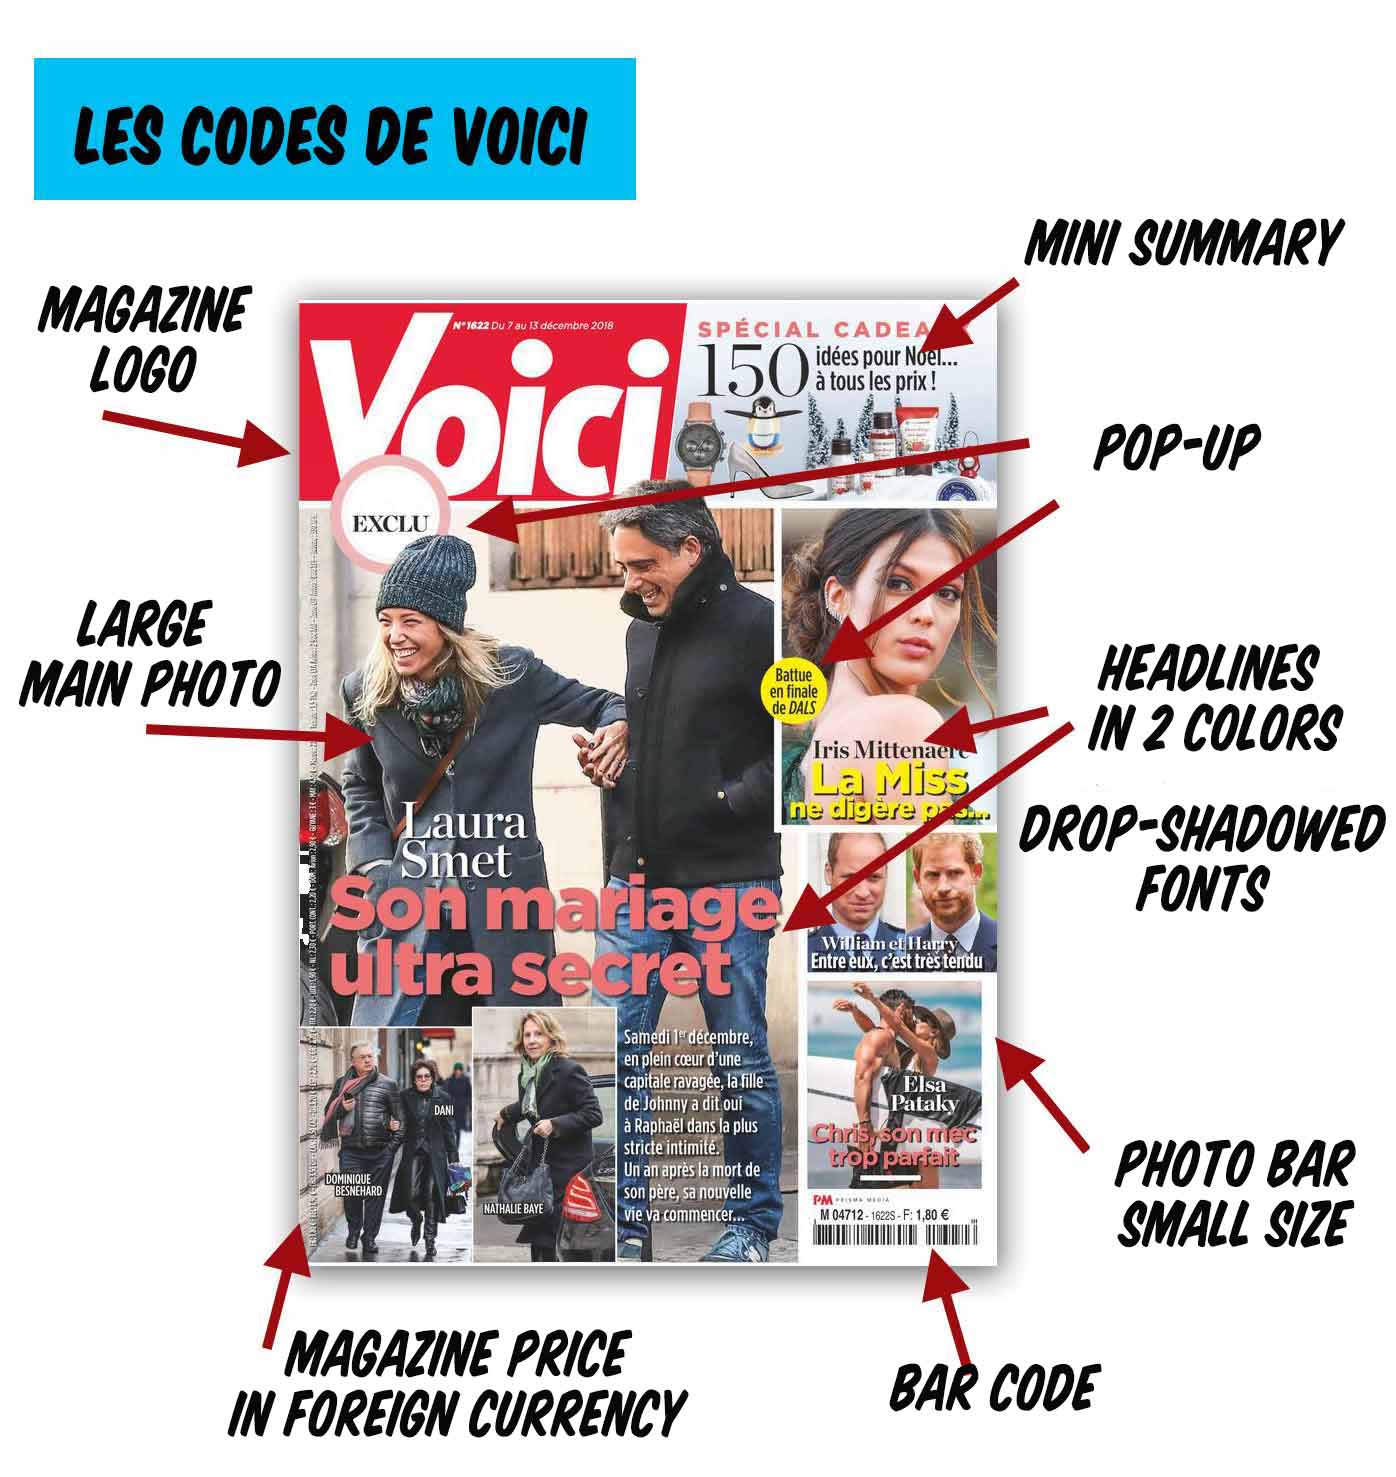
The titles, previously tilted, now horizontal, and with very simple fonts, use bright colours: red, yellow, pink, white... and words: "exclusive", "last", "always"...
Some round pop-ups with a short sentence or the words "scoop", "excluded"...
All this helps to fix the image of VOICI in our minds and makes us immediately identify this magazine among others in the same department.
These codes evolve over time, sometimes oversimplifying, sometimes overly elaborate: VOICI adapts to the fashions and desires of its readers!
 The plan of the photo montage
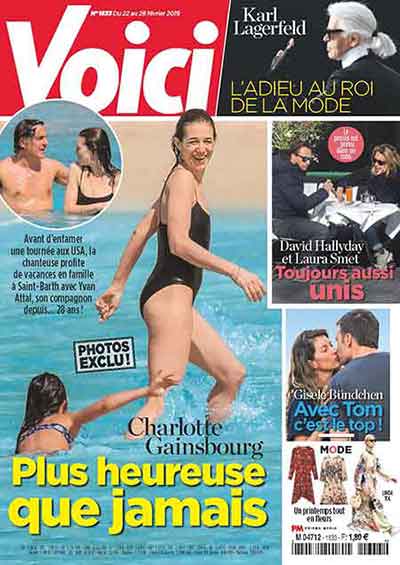
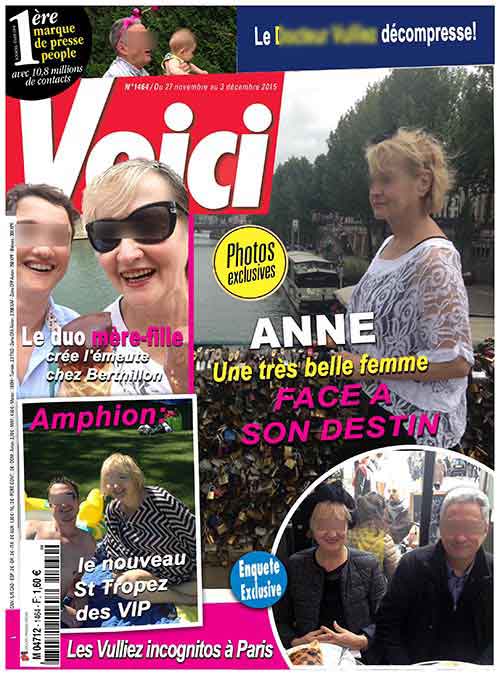
Here is a "real" front page of VOICI...
According to what we have analyzed, it is now easy to establish freehand the assembly plan of our fake-VOICI that we are going to follow:

We will use the "real page" as a template... it's still the simplest way to build our fake! If you want to work with this page you can download it HERE...
You have to prepare :
4 Photos, one of which is the main one and the 4 captions and texts that accompany them...
Cutting out the fake one VOICI...
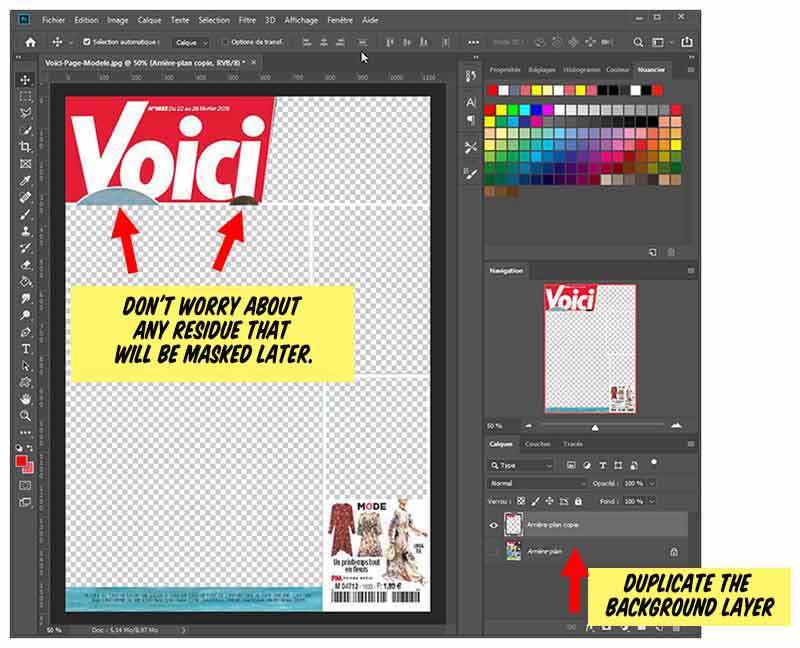
Open the real page in photoshop... And start by duplicating this background page in order to work on a copy and not on the original.
With the rectangle selection marquee tool , select the areas to be deleted... For the main photo, it will be necessary to do it twice since it has an offset...
For the photo at the top right of the VOICI title and which is not rectangular, use the lasso polygonal tool to precisely delimit the area to be deleted.
There may be some "residues" left, especially in the title, which we will hide later... We only keep the title, the price bar (there is still a blue background but it is not disturbing) and the barcode at the bottom right with the mode reminder. We will later recover the missing head piece of the model...
Setting up the photos...
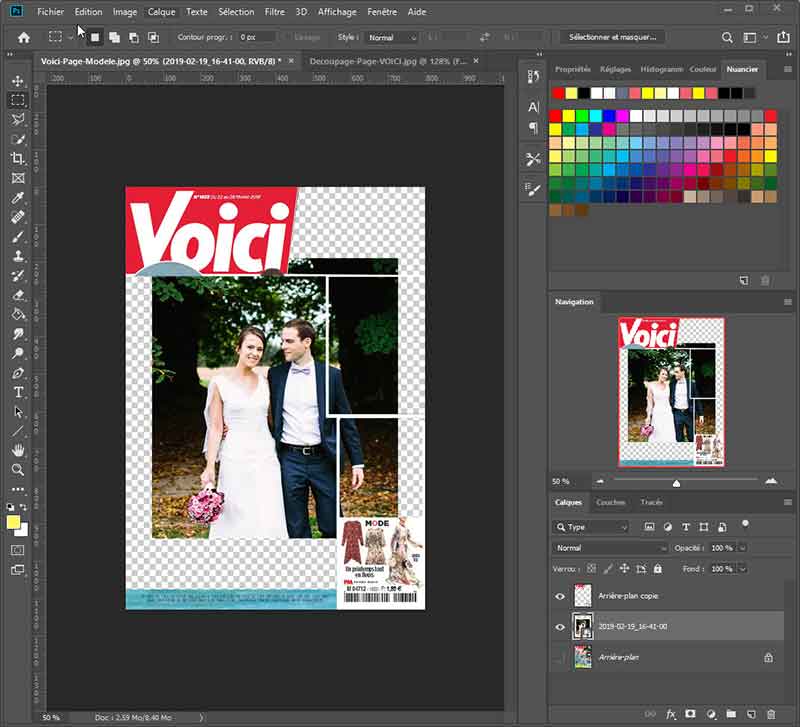
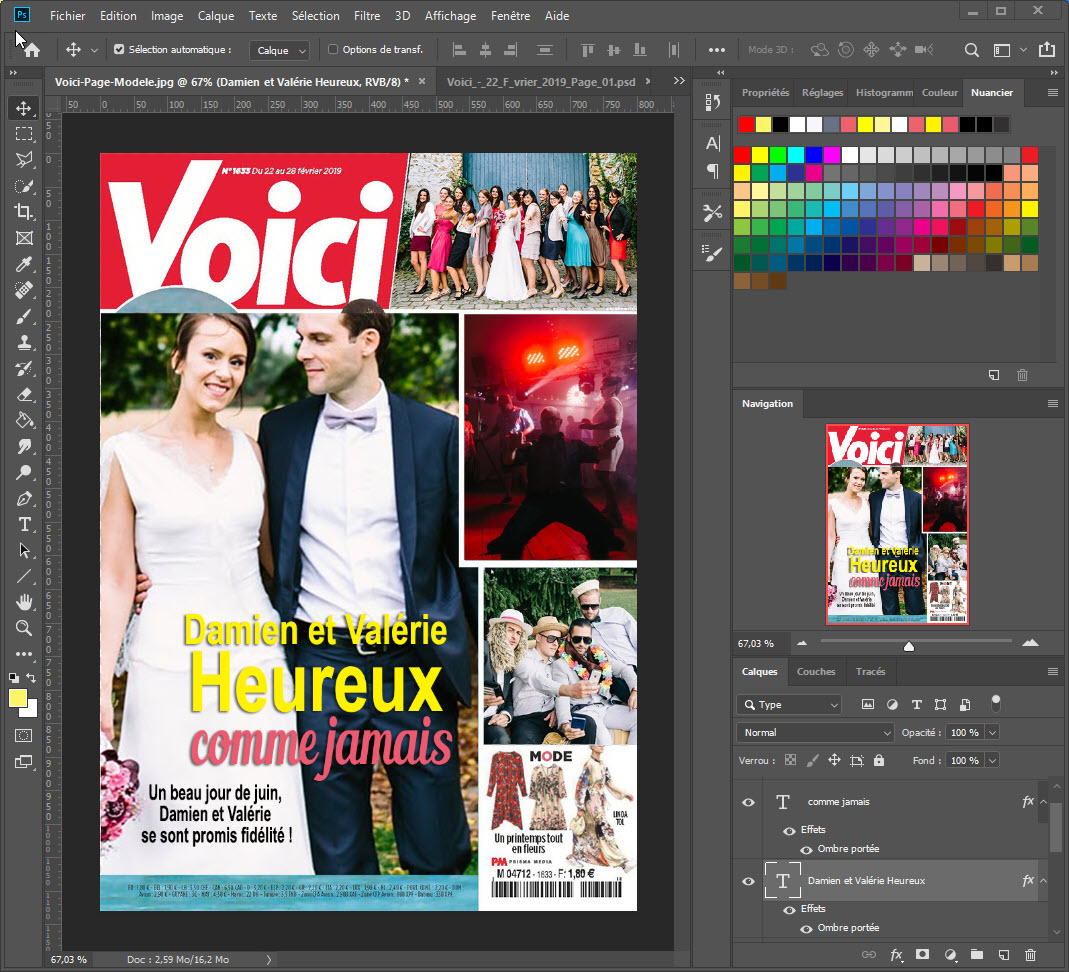
Create a new layer "photo-principal" just below the model obtained above, paste the first photo: that of the two bride and groom!
Select your photo and, by playing on the handles, enlarge or reduce your image to have the desired framing ... Arrange yourself so that the heads overflow on the title...
Make a copy of this photo and reserve it in a layer... You will need it, at the end of the tutorial to get the heads of the bride and groom that will be superimposed on the title VOICI.
With the rectangle selection tool, select the parts of this image to keep and, after inversion, remove the excess... You will do it in 2 steps because of the indentation on the right of the main image...
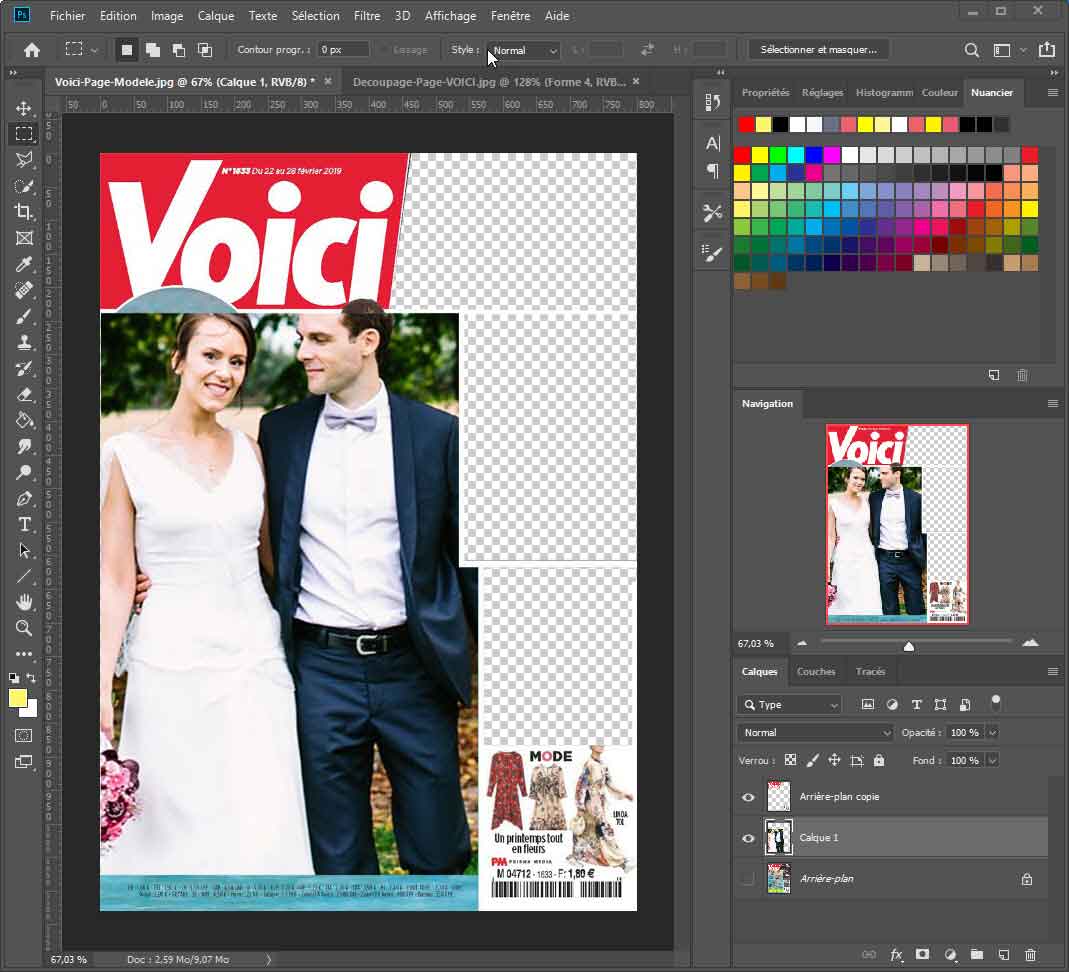
This is what you should get at the end of this step :
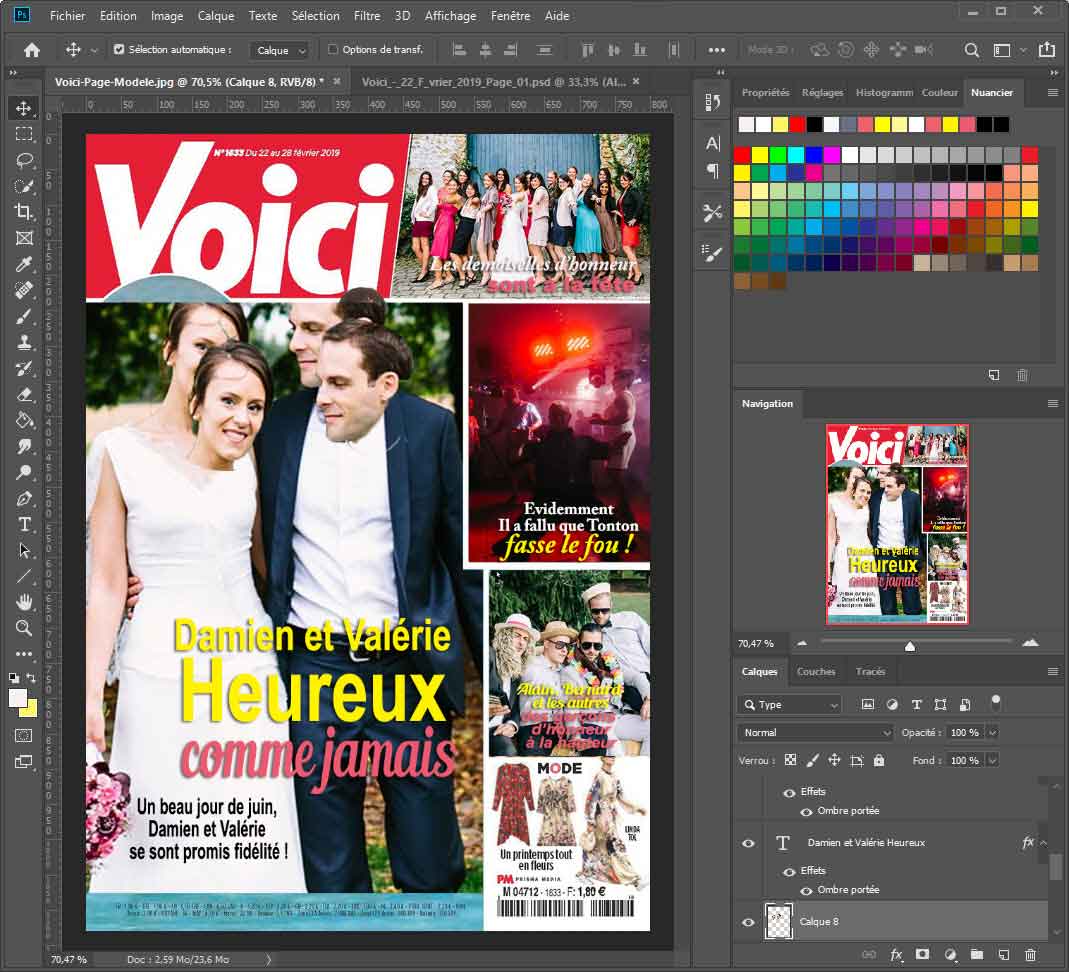
Start again with the 3 other photos... by adapting the size of this one to the opening then by removing the useless parts... You get this:
Note that for the moment the cut-off heads of the bride and groom as well as that of the mannequin on the bottom right remain... We'll get them back later...
Editing the texts
Les textes s'inscrivent en superposition des photos... Créez donc les calques textes immédiatement au-dessus des calques-photo de celles-ci...
The fonts used are simple: Arial Bold or black, Futura, Caslon in "mix"... sometimes more complicated: Lobster, Blenda, Coffee... You can find all these fonts in free download on Dafont.com or on OnlineWebFonts.com : most of the time, you just have to type the name of a font in google to get links to download it!
Keep going so that each photo has its own caption... Vary the colors in the same caption as well as the font sizes...
For better legibility, shade the texts: they will stand out better. Don't use too much shadow, just the right amount. For the text above, I've taken as settings: d:3, g:2 and t:4... it's enough to contrast well on light backgrounds.
Main photo: head finishes
We had left the heads of the bride and groom incomplete... Take your main photo and with the lasso, select the heads of the bride and groom.
Now you have to isolate these heads by removing the background: this can be done with the method of your choice: with the eraser tool, with the quick selection tool or by using a mask ... Take the method that suits you best!
You will paste the heads in a layer just above the "SCOOP" pop-up: you won't even need to resize them when you drag them in their place...
Do the same for the head of the mannequin at the bottom right of the page...
Pop-ups
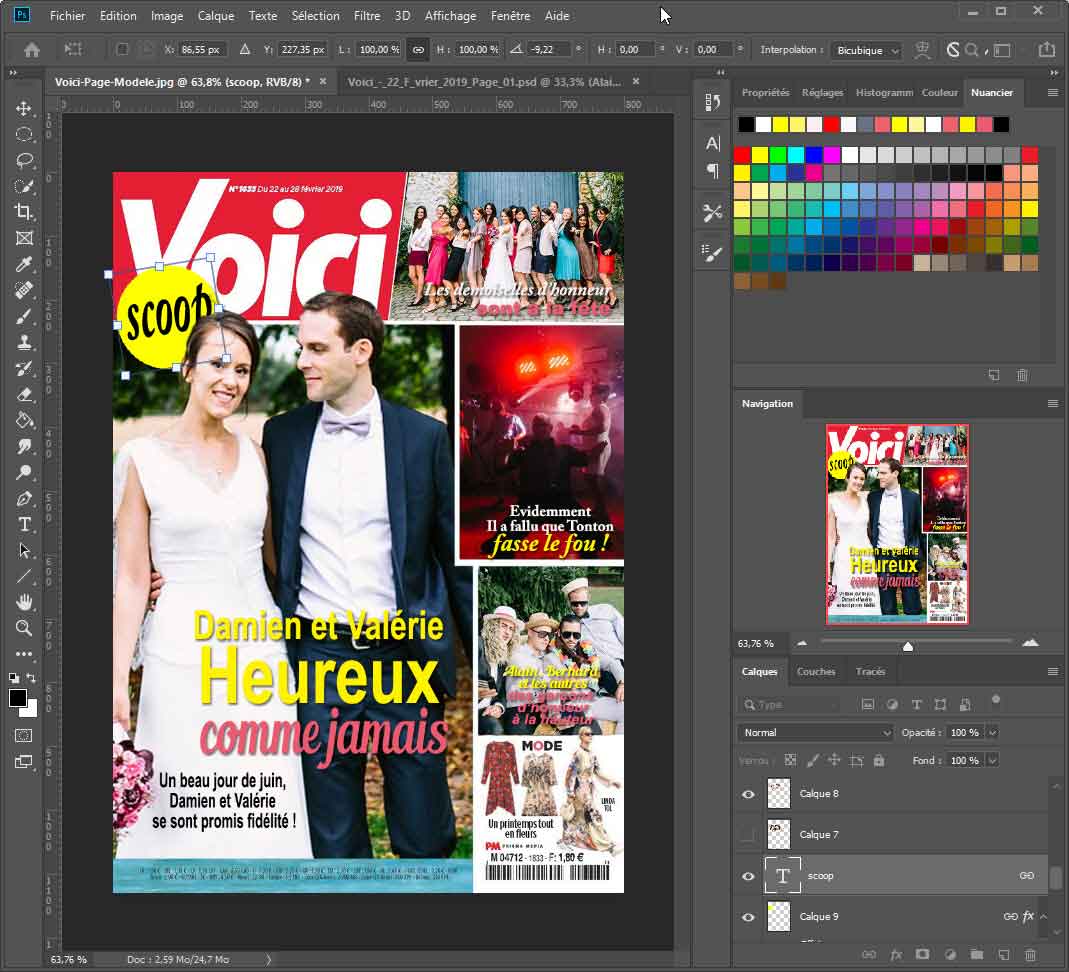
We'll use a pop-up "scoop" to hide the lack in the title VOICI, to the left of the bride's head .
Create a new layer just above the template page since it will hide part of the title (the one that is already missing). With the ellipse selection tool and by pressing Shift to force the perfect circle, draw a circle of the desired size.
Fill it with fluorescent yellow using the paint pot tool.
Select the color black and now take the text tool. Type "SCOOP" and drag the text into the yellow pop-up . Adjust the dimensions of the text by typing Ctrl+T and play with the handles.
Then place this pop-up on the template page but under the bride's head... to finish filling the hole in the title... Tilt this pop-up slightly if necessary...
Your page is complete... All you have to do now is print it in A4 (or larger) format!
If it's a gift...
I suggest that you print this page on a 30x40 canvas... Depending on the site you choose you will get 13 to 40€ for this print : the cheapest ones monoeuvre.fr or Photo-sur-Toile.fr.
 You want a taylor made page?
You're in a hurry... it's due tomorrow... and you don't have time to deal with it... You don't know how to use Photoshop or other graphics software...
I can quickly make a fake magazine page for you... for a small fee.
Email me the photos... And suggest titles and captions... you specify the name of the magazine : VOICES, CLOSER or others that you want to imitate...and, in 24 hours, I will send you the result : all you have to do is print it...
You can contact me
via email ou par téléphone au +33 6 62667842.
Bases of contribution :
10€ for the page background and 3€ per photo on this page...
For example, this page will cost 25€...
Prenez contact par mail or by Tel : +33 6 62667842